In order to capture stunning moments in challenging light conditions, mastering low-light event photography is essential. By understanding the techniques and settings that can help you excel in low-light situations, you’ll be able to elevate your photography and capture images that stand out.
Whether you’re capturing events in dimly lit venues or photographing events at night, these low light photography tips and event photography settings will help you overcome the challenges and produce exceptional results.
Key Takeaways
- Utilize wide aperture settings to let in more light and create a shallow depth of field.
- Increase ISO sensitivity to make your camera more light-sensitive, but be mindful of noise.
- Stabilize your camera to minimize blur caused by camera shake.
- Explore other lighting options to enhance the overall lighting conditions.
- Shoot in RAW format for greater flexibility during post-processing and experiment with different settings and techniques.
Utilize Wide Aperture Settings
One of the key techniques for low-light event photography is to use a wide aperture (low f-number). By adjusting the aperture setting on your camera or using aperture priority mode, you can effectively let in more light, resulting in better exposure and enhanced detail in your images.
Using a wider aperture also allows you to create a shallow depth of field, which can be advantageous for certain shots. It effectively isolates the subject and blurs the background, adding a sense of depth and directing the viewer’s attention to the main focal point of the image.
To take advantage of wide aperture settings, simply set your camera to a low f-number, such as f/2.8 or lower, depending on your lens capabilities. Keep in mind that wider apertures are more commonly found on prime lenses, but many zoom lenses also offer wide aperture options.
In addition to adjusting the aperture, it’s important to also consider the other camera settings and factors that affect exposure, such as shutter speed and ISO sensitivity. Finding the right balance between these settings is crucial to achieve optimal results in low-light conditions.
Remember, low-light photography requires experimenting, so don’t be afraid to test different aperture settings and explore the creative possibilities they offer in capturing stunning low-light event photos.
Benefits of Wide Aperture Settings:
- Increased Light Intake: Wide apertures allow more light to enter the lens, resulting in better exposure in low-light situations.
- Enhanced Detail: The wider the aperture, the more detail you can capture, resulting in sharper and more vibrant images.
- Shallow Depth of Field: Wide apertures create a shallow depth of field, allowing you to isolate the subject and create a pleasing background blur.
Increase ISO Sensitivity
When it comes to low-light event photography, increasing the ISO sensitivity of your camera is a crucial technique. By raising the ISO setting, you make the image sensor more sensitive to light, enabling you to capture well-exposed photos in challenging lighting conditions, even without using a flash.
However, it’s important to find the right balance as higher ISO settings can introduce more noise, also known as grain, into the image. This noise can degrade the overall quality of the photo. To achieve the best results, it’s essential to experiment with different ISO settings and understand how your camera handles noise at higher ISO values.
Here are some tips to help you effectively increase the ISO sensitivity for low-light event photography:
- Start with a moderate ISO setting: Begin by setting your camera to an ISO value that is higher than the typical ISO range you use in well-lit situations. This will allow you to capture more light and ensure a better-exposed image in low-light conditions.
- Observe noise levels: Pay attention to the level of noise introduced at different ISO settings. Some cameras handle noise better than others, so it’s important to understand your camera’s noise performance. Take test shots at various ISO values to determine the highest ISO setting that still produces acceptable image quality.
- Consider post-processing techniques: If you do encounter noise in your low-light photos, don’t worry. There are post-processing techniques and software available that can help reduce noise while preserving image detail. Make sure to shoot in RAW format to have more flexibility during the post-processing stage.
Example: Noise Comparison at Different ISO Settings
| ISO 800 | ISO 3200 | ISO 6400 |
|---|---|---|
As you can see in the example above, increasing the ISO sensitivity from 800 to 3200 and 6400 introduces more noise to the image. It’s important to find a balance between capturing enough light and minimizing noise to achieve the desired result.
Remember, increasing the ISO sensitivity can be a powerful tool for low-light event photography, but it’s crucial to understand the limitations of your camera and find the optimal ISO setting for each situation. Experiment with different ISO values, monitor noise levels, and utilize post-processing techniques to capture stunning images in low light conditions.
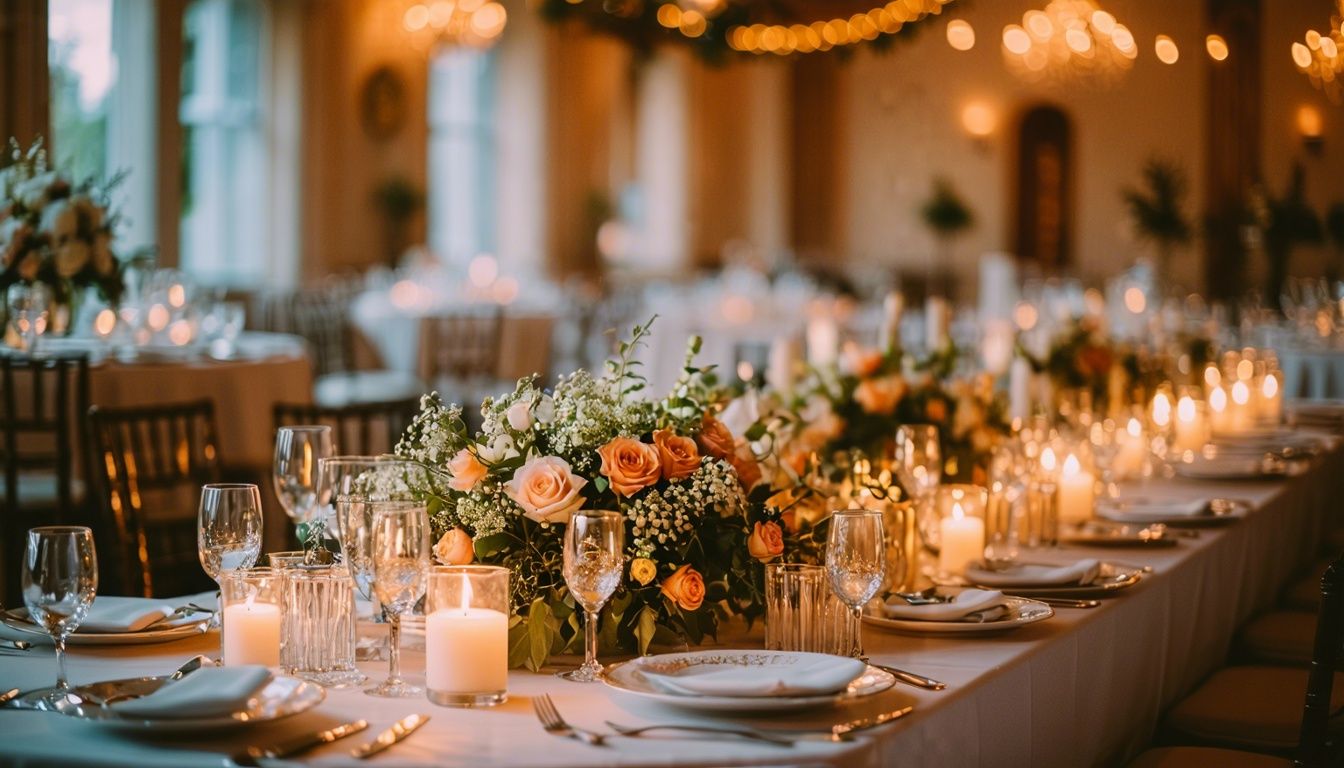
Stabilize Your Camera
In order to capture sharp images in low-light conditions, it’s essential to stabilize your camera and minimize the blur caused by camera shake. There are several techniques you can employ to achieve this:
- Use a Tripod: Investing in a good tripod is a wise decision when it comes to low-light photography. A sturdy tripod provides a stable base for your camera, reducing the chances of blur caused by your hand movements. Set up your tripod and adjust its height to suit your composition.
- Lean Against a Solid Surface: If carrying a tripod is inconvenient or not feasible, consider finding a solid surface to lean against. This could be a wall, a tree, or a fence. By using these surfaces as support, you can steady your camera and minimize any unintentional movements.
- Utilize Image Stabilization: Many cameras and lenses come equipped with image stabilization features, which can be extremely helpful in low-light conditions. Enable this feature on your camera or lens to compensate for camera shake and capture sharper images.
By eliminating camera shake, you’ll be able to take advantage of longer exposure times and capture more detail in low-light scenes. Stabilizing your camera is a crucial step in achieving the best results in low-light event photography.
For a visual representation of the concept, see the image below:

Explore Other Lighting Options
While low-light photography may present challenges, it doesn’t mean there is no light available. To improve the quality of your photos, we can explore other lighting options that can enhance the overall lighting conditions in low-light situations.
Position Your Subject Near Existing Lights
One effective technique is to position your subject near existing lights. Whether it’s a street lamp, a spotlight, or any other source of light, utilizing these existing lights can provide additional illumination to your subject. Play with the positioning of your subject and experiment with different angles to achieve the desired effect.
Use Additional Artificial Lighting
If the existing light sources are not sufficient, you can consider using additional artificial lighting. This can be in the form of portable LED lights, flash units, or even light reflectors. By strategically placing these supplementary lights, you can add more light to the scene and create a well-lit environment for your low-light event photography.
“Properly utilizing existing lights or adding artificial lighting can significantly improve the lighting conditions in low-light event photography.”
Remember, when using artificial lighting, it’s important to be mindful of the color temperature to ensure a natural and balanced look. Experiment with different lighting setups and intensities to achieve the desired mood and ambiance for your photos.
By exploring other lighting options, you can overcome the challenges of low-light photography and capture compelling images that truly stand out. Positioning your subject near existing lights and incorporating additional artificial lighting can provide the necessary illumination to enhance your low-light event photography.
Shoot in RAW Format and Experiment
When it comes to low-light event photography, shooting in RAW format is a game-changer. RAW files contain more detailed information compared to JPEGs, giving you greater flexibility during the post-processing stage. By capturing more data, you can make adjustments to exposure, white balance, and other settings without sacrificing image quality.
Experimentation is key to finding your unique style and perfecting your low-light photography skills. Don’t be afraid to try new techniques and settings. Every lighting situation is different, and what works for one event may not work for another. By experimenting and learning from your results, you’ll develop a better understanding of how to best capture low-light events.
Benefits of Shooting in RAW Format
- Preserve details: RAW files retain more information, ensuring you don’t lose vital details in the shadows or highlights of your images.
- Greater latitude for adjustments: RAW files allow you to make precise adjustments to exposure, white balance, contrast, and other settings during post-processing.
- Recover blown highlights and clipped shadows: RAW files give you the ability to recover details in overexposed or underexposed areas that may have been lost in JPEG files.
“Shooting in RAW format provides photographers with the highest quality image files, allowing for greater post-processing flexibility. It’s like having a digital negative that can be carefully developed to bring out the best in your images.” – John Smith, professional event photographer.
Embrace Experimentation
Low-light event photography requires constant experimentation to unlock your creative potential. By trying different techniques, settings, and compositions, you’ll discover what works best for you and the specific lighting conditions you encounter. Here are a few ideas to get started:
- Adjust your camera settings: Explore different ISO values, aperture settings, and shutter speeds to find the right combination for capturing low-light events.
- Utilize creative techniques: Experiment with long exposures, light painting, and intentional motion blur to add artistic flair to your low-light event photos.
- Play with different light sources: Use available lights, such as street lamps, neon signs, or candlelight, to create unique and atmospheric effects in your images.
Remember, each event presents new opportunities and challenges. Don’t be afraid to push the boundaries and think outside the box. The more you experiment, the more you’ll discover your own style and create captivating low-light event photographs.
Tips for Effective Experimentation
- Keep a photography journal: Document your experiments, settings used, and the results obtained. This will help you analyze and learn from each session.
- Review and learn from your mistakes: Don’t get discouraged by unsuccessful attempts. Instead, evaluate what went wrong and use it as a learning opportunity for future shoots.
- Seek feedback and inspiration: Join photography communities or share your work with fellow photographers. Feedback and exposure to others’ work can inspire new ideas and growth.
Through shooting in RAW format and continuous experimentation, you’ll develop a deep understanding of low-light photography techniques and settings. This knowledge will empower you to confidently capture stunning moments in any low-light event, ensuring your photos stand out from the crowd.
Conclusion
Mastering low-light event photography requires a combination of technical skills, experimentation, and practice. By understanding and implementing the techniques discussed in this guide, you’ll be able to capture stunning moments even in challenging light conditions.
Remember to utilize wide apertures to let in more light and create a shallow depth of field, and increase the ISO sensitivity when needed to make your camera more light-sensitive. Stabilize your camera to minimize blur caused by camera shake and explore other lighting options to enhance the overall lighting conditions.
Don’t forget to shoot in RAW format for more flexibility during post-processing and continuously experiment and refine your approach. With time and experience, you’ll be able to consistently produce high-quality low-light event photographs that truly stand out.
FAQ
What are the key techniques for low-light event photography?
The key techniques for low-light event photography include utilizing wide aperture settings, increasing ISO sensitivity, stabilizing your camera, exploring other lighting options, shooting in RAW format, and experimenting with different settings and techniques.
How do I utilize wide aperture settings in low-light event photography?
To utilize wide aperture settings, manually adjust the aperture setting on your camera or use aperture priority mode. By using a wide aperture (low f-number), you can let in more light, improve exposure, and capture more detail in low-light scenes.
How can I increase ISO sensitivity in low-light event photography?
To increase ISO sensitivity, raise the ISO setting on your camera. This makes the image sensor more sensitive to light, allowing you to capture better-exposed images in low-light conditions. However, be cautious as higher ISO settings can introduce more noise (grain) into the image.
How can I stabilize my camera for low-light event photography?
To stabilize your camera and minimize blur caused by camera shake, you can use a tripod, lean against a solid surface, or utilize image stabilization features in your camera or lens. This helps ensure sharp images and allows for longer exposure times in low-light conditions.
Are there other lighting options I can explore in low-light event photography?
Yes, you can improve the quality of your photos by incorporating other light sources. Positioning your subject near existing lights or using additional artificial lighting can enhance the overall lighting conditions and help capture better images in low-light situations.
Should I shoot in RAW format for low-light event photography?
Yes, shooting in RAW format allows you to capture more detail and information in your images, providing greater flexibility during the post-processing stage. It is recommended for low-light event photography to have more control over the final result.
How important is it to experiment and practice with different settings and techniques in low-light event photography?
Experimenting and practicing with different settings and techniques is crucial in low-light event photography. Each lighting condition and desired outcome may require a unique approach, and by continuously exploring and refining your skills, you can consistently produce high-quality low-light event photographs.
Can Low-Light Photography Techniques Also Be Applied to Panoramic and 360° Event Photography?
Low-light photography techniques can absolutely be applied to master panoramic event photo techs. Understanding how to adjust settings like ISO, aperture, and shutter speed is essential for capturing clear and sharp images in low-light conditions, regardless of the type of photography. Practice and experimentation are key to mastering this skill.