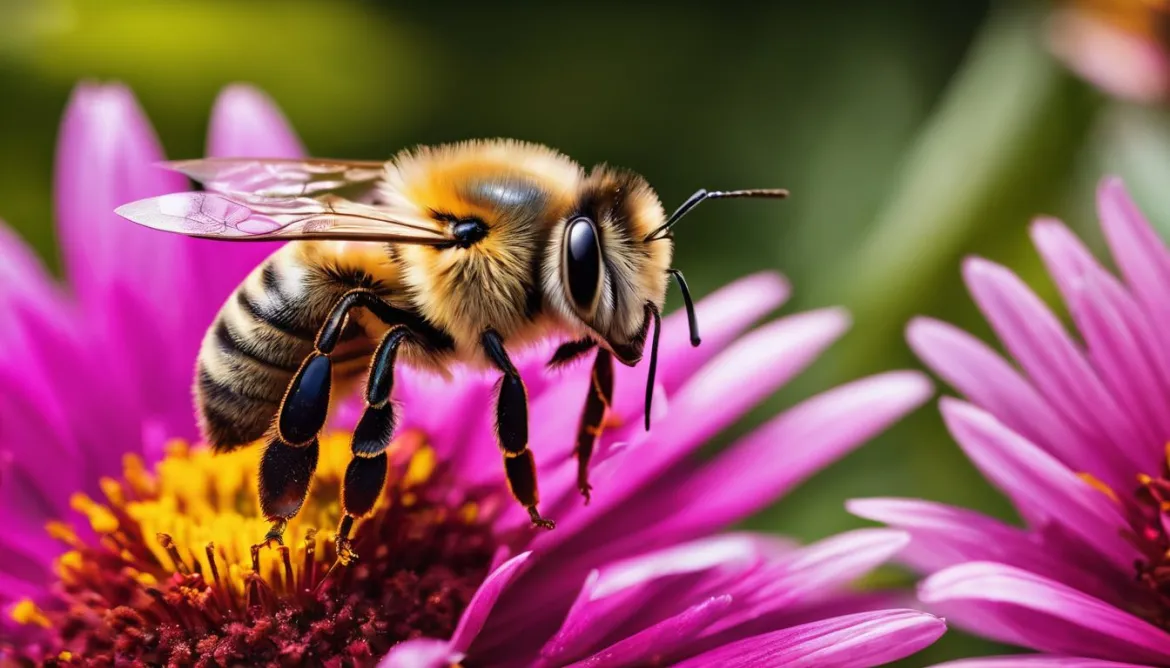
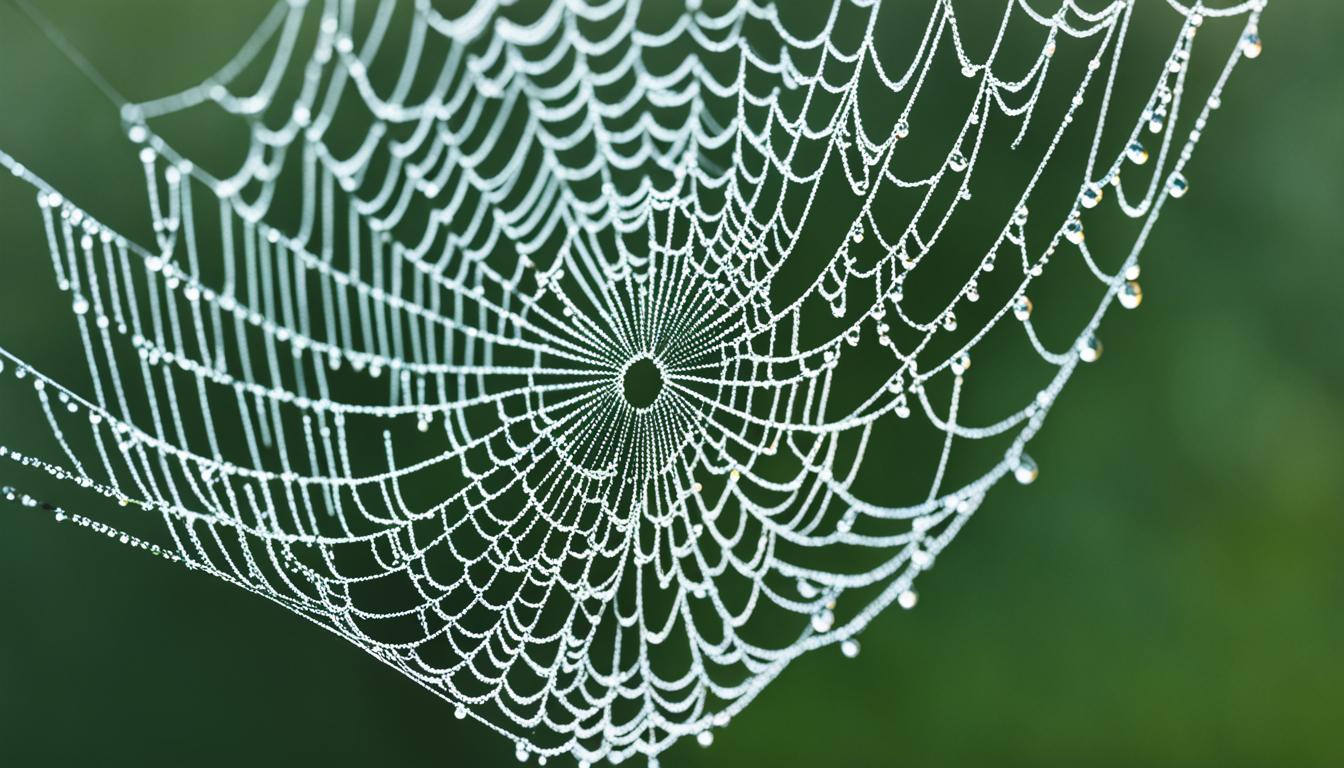
Welcome to our guide on advanced macro photography techniques. If you’re ready to take your close-up shots beyond the basics, this article is for you. In this guide, we will explore tips and strategies that will help you achieve stunning results in your macro photography.
Macro photography allows us to capture the intricate details of the miniature world around us. By going beyond the basics, you can unlock the full potential of your macro shots and create truly breathtaking images. We will dive into topics such as achieving razor-sharp focus, managing depth of field, utilizing focus stacking, leveraging the right equipment, lighting techniques, and composition principles to enhance your macro photography skills.
Key Takeaways:
- Explore advanced techniques to elevate your macro photography skills
- Achieve razor-sharp focus through focus stacking and manual focus
- Master depth of field to create stunning macro images
- Enhance your macro compositions with composition principles
- Discover tips for successful macro photography, including patience and understanding subject behavior
Macro Photography Techniques for Sharp Focus
Achieving sharp focus is essential when it comes to macro photography. In this section, we will explore a variety of techniques that will help you capture stunningly sharp and detailed images of the miniature world around us. These techniques include:
- Focus Stacking: This technique involves capturing multiple images at different focal points and merging them together to create a final image with an extended depth of field. Focus stacking is particularly useful when photographing subjects with intricate details and shallow depth of field.
- Manual Focus: Utilizing manual focus allows you to have complete control over the focusing process. By manually adjusting the focus ring on your lens, you can ensure that the key elements of your subject are in sharp focus.
- Using a Tripod: A tripod provides stability and reduces the chances of camera shake, which can result in blurry images. When shooting macro photography, using a tripod is highly recommended to maintain a steady and sharp focus.
- Stabilization Techniques: In addition to using a tripod, there are other stabilization techniques you can employ to minimize camera shake. These include using a cable release or remote shutter release, mirror lock-up, and utilizing the camera’s built-in image stabilization feature.
- Extension Tubes: Extension tubes are hollow tubes that are inserted between the camera body and lens to increase the distance between the lens and the image sensor. This extension allows for closer focusing, resulting in higher magnification and sharper macro images.
- Ring Flash: Ring flashes are circular-shaped flashes that attach directly to the front of your lens. They provide even and shadowless lighting, reducing the chance of harsh shadows and enhancing the sharpness of your macro images.
- Diffusers: Diffusers are accessories that soften and distribute light evenly, reducing the intensity of harsh lighting. Using diffusers can help eliminate glare and highlight the intricate details of your macro subject, resulting in sharper and more visually appealing images.
By employing these macro photography techniques, you’ll have the tools and knowledge to capture remarkable close-up shots with impeccable sharpness. Let’s dive deeper into these techniques and explore how you can apply them to your own macro photography endeavors.
Mastering Depth of Field in Macro Photography
Depth of field is a crucial factor in capturing stunning macro images. It refers to the zone of sharp focus in your photograph, from the nearest point to the farthest point. Mastering depth of field allows you to highlight specific details or create a dreamy, blurred background effect.
Aperture control plays a vital role in managing depth of field. By adjusting the aperture settings on your camera, you can control the size of the lens opening and influence the depth of field in your macro images. A narrower aperture (higher f-number) results in a greater depth of field, allowing more of your subject to be in focus. On the other hand, a wider aperture (smaller f-number) creates a shallow depth of field, isolating your subject and producing a beautiful background blur.
When shooting macro photography, understanding how aperture affects depth of field is essential. A narrower aperture can be beneficial when you want to capture intricate details in your subject, such as the textures of a flower petal or the delicate patterns on an insect’s wing. On the contrary, a wider aperture can help you create a more artistic and abstract image by emphasizing a specific element of your subject.
To effectively use aperture control in macro photography, consider the following techniques:
- Experiment with different aperture settings: Try capturing the same subject using both narrow and wide apertures to understand the distinct effects they create in terms of depth of field.
- Focal point selection: Depending on your intent, choose a focal point that will be in sharp focus, considering the depth of field range for each aperture setting.
- Foreground and background elements: Take into account the relationship between your subject and the surrounding elements. A narrow aperture may be ideal for creating a clear, uninterrupted focus throughout the entire image, while a wide aperture can help create separation between the subject and the background.
- Visual storytelling: Use depth of field to convey a narrative or draw attention to specific details in your macro images. Experiment with different aperture settings to achieve the desired effect.
Remember, the key to mastering depth of field in macro photography is practice and experimentation. By understanding how aperture control influences the depth of field in your images, you can take full control of your macro photography and create captivating and visually striking photographs.
| Aperture Setting | Depth of Field | Effect |
|---|---|---|
| Narrow Aperture (High f-number) | Greater depth of field | More subjects in the image are in focus |
| Wide Aperture (Low f-number) | Shallow depth of field | Isolates the subject from the background, creating a blurred background effect |
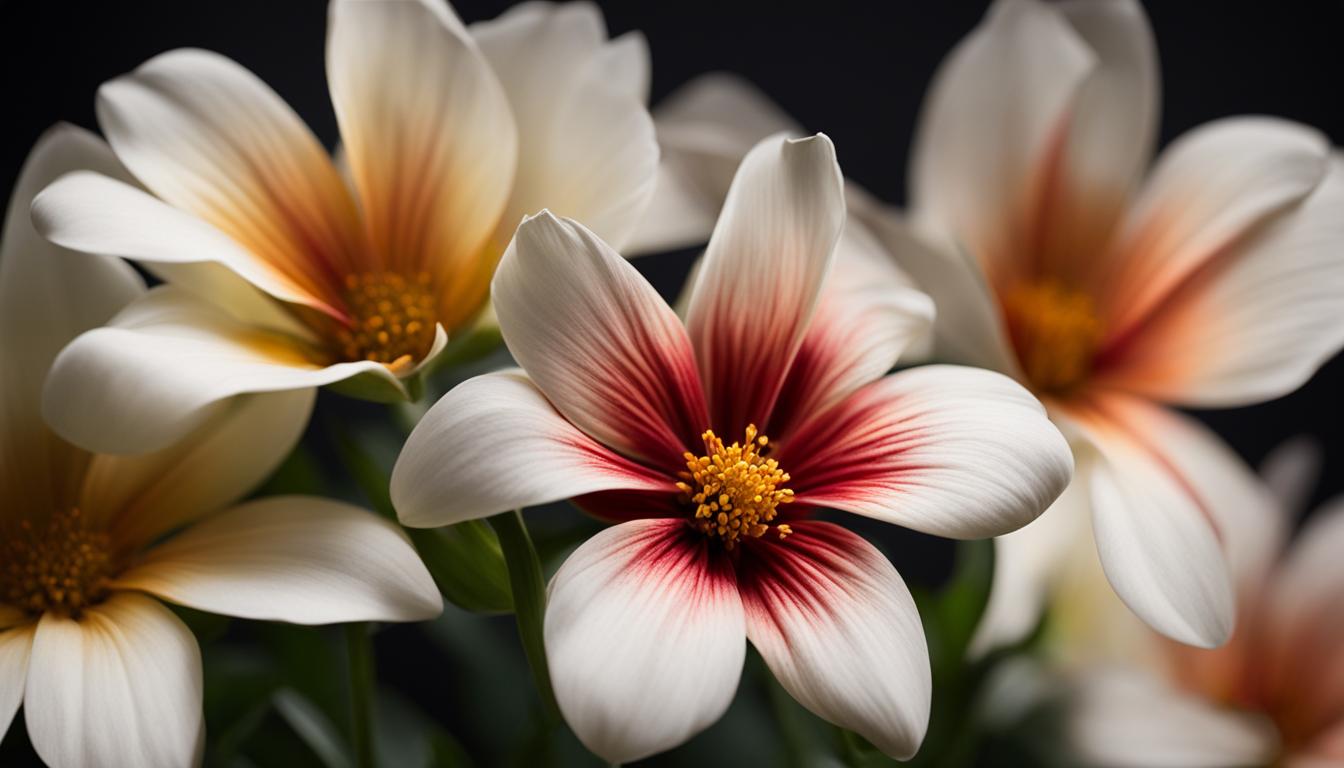
Macro Photography Composition Techniques
When it comes to macro photography, composition is key. By applying various composition techniques, you can create visually captivating images that highlight the intricate details of your macro subjects. In this section, we will explore the use of composition techniques such as the rule of thirds, leading lines, negative space, and experimentation to elevate your macro photography skills.
The Rule of Thirds
One of the fundamental principles of composition is the rule of thirds. By dividing your frame into a grid of nine equal parts using two horizontal and two vertical lines, you can create a more balanced and visually pleasing image. Positioning your subject along the intersecting lines or at the points where the lines intersect can help draw the viewer’s attention and add interest to your macro shots.
Leading Lines
Leading lines are another powerful composition technique that can guide the viewer’s eyes through your macro photograph. Look for natural or man-made lines in your frame, such as branches, petals, or even the veins of a leaf, that lead towards your subject. These lines can add depth and a sense of movement to your image, making it more engaging and dynamic.
Negative Space
Don’t be afraid of empty spaces or negative space in your macro compositions. Negative space refers to the areas of your image that are intentionally left empty or devoid of any subject matter. By incorporating negative space, you can create a sense of balance, emphasize your main subject, and draw attention to the intricate details of your macro subject.
Experimentation
In the world of macro photography, experimentation is the key to unlocking unique and creative compositions. Break away from conventional composition techniques and explore different angles, perspectives, and framing options. Play with depth of field, focus points, and lighting to discover new and exciting ways to showcase the beauty of your macro subjects.
Remember, composition is subjective, and what may work for one photographer may not work for another. The key is to practice, experiment, and develop your own unique style. By mastering the art of composition in macro photography, you can create visually stunning images that will captivate your viewers.
Experiment with composition techniques such as the rule of thirds, leading lines, and negative space to create visually captivating macro photographs.
Tips for Successful Macro Photography
When it comes to macro photography, patience is key. Understanding the behavior of your subjects and taking the time to observe them can make all the difference in capturing truly remarkable shots. To help you further enhance your macro photography skills, we’ve compiled a list of tips and techniques that are sure to elevate your work.
1. Embrace Patience and Observation
Macro photography often requires waiting for the perfect moment to capture a shot. Take your time and be patient. Watch your subject closely, learn its habits, and anticipate its movements. This way, you’ll be ready to snap those fleeting, magical moments.
2. Make the Most of the Golden Hour
The golden hour, the hour after sunrise and the hour before sunset, is a magical time for any photographer. The soft, warm light during these times of day adds a beautiful glow to your macro images. Embrace this golden light and capture stunning shots that evoke a sense of tranquility and beauty.
3. Bracket Exposure for Perfectly Balanced Shots
Macro photography often involves dealing with challenging lighting conditions. To ensure that you capture the right exposure for your subject, consider bracketing your shots. This technique involves taking multiple images of the same subject at different exposure levels, allowing you to select the perfectly balanced shot during post-processing.
4. Harness the Power of Post-processing
Post-processing is an essential part of macro photography. With the right editing software, such as Luminar Neo, you can enhance the details, colors, and overall impact of your macro images. Experiment with different post-processing techniques to bring out the true beauty of your close-up shots.

“Macro photography is an art that requires both technical skill and a creative eye. By honing your patience, understanding your subject’s behavior, leveraging the golden hour, bracketing exposure, and mastering the art of post-processing, you’ll be well on your way to capturing breathtaking macro images that truly showcase the beauty of the miniature world around us.”
5. Stay Curious and Experiment
Macro photography offers endless opportunities for exploration and experimentation. Don’t be afraid to try different angles, perspectives, and compositions. Seek out unique subjects and experiment with different techniques to create one-of-a-kind macro images that stand out.
6. Always Be Prepared
Finally, always be prepared for your macro photography adventures. Make sure you have the right equipment, including a macro lens, tripod, and lighting tools. Carry extra batteries and memory cards, and pack a small cleaning kit to keep your gear in top shape. Being well-prepared will allow you to focus on capturing the perfect shot in any situation.
Introduction to Focus Stacking in Macro Photography
Focus stacking is an invaluable technique in macro photography that allows us to capture stunning images with an enhanced depth of field. With focus stacking, we can achieve sharp and detailed results by combining multiple images taken at different focal points. This technique is particularly useful when photographing subjects with intricate details or when using wide apertures that result in shallow depth of field.
One tool that can greatly assist us in the focus stacking process is Luminar Neo, a powerful photo editing software designed specifically for photographers. Luminar Neo provides advanced editing capabilities, allowing us to seamlessly merge and blend images to create a final photo with optimal focus throughout the entire subject.
Focus stacking opens up a world of possibilities in macro photography, enabling us to capture the intricate beauty of even the tiniest subjects. Through this technique, we can achieve a greater depth of field that brings our macro images to life.
The Benefits of Focus Stacking
Focus stacking offers several advantages that elevate our macro photography to new heights. Here are some notable benefits:
- Enhanced depth of field: By combining multiple images focused on different areas of the subject, focus stacking produces a final photo with an overall sharpness that cannot be achieved with a single shot.
- Increased subject detail: Focus stacking enables us to capture intricate details and textures that might be missed with a shallow depth of field
- Expanded creative possibilities: With focus stacking, we have more flexibility in our compositions, as we can maintain sharp focus on both the foreground and background elements of our scenes.
Step-by-Step Guide to Focus Stacking Using Luminar Neo
To demonstrate how to utilize focus stacking in macro photography, we will provide a step-by-step guide using Luminar Neo:
- Import your series of macro images into Luminar Neo.
- Select the images that will be used for focus stacking.
- Access the focus stacking feature in Luminar Neo.
- Adjust the stacking method and alignment options to optimize the final result.
- Preview the focus stack blending and make any necessary adjustments.
- Apply the focus stacking process to merge the images together.
- Refine the merged image using Luminar Neo’s advanced editing tools.
- Save the final focus-stacked image in your desired file format.
By following this step-by-step guide, you can harness the power of focus stacking using Luminar Neo to achieve incredible depth and detail in your macro photography.
Choosing the Right Equipment for Macro Photography
Having the right equipment is crucial for capturing stunning macro photography. Here, we will discuss the essential gear you need to elevate your macro shots. From macro lenses to tripods and lighting equipment, we’ll help you choose the right tools for achieving professional-level results.
Macro Lens
A high-quality macro lens is the cornerstone of macro photography. It allows you to focus on the intricate details of your subject, capturing stunning close-up shots. When selecting a macro lens, consider factors such as focal length, magnification ratio, and image stabilization. Brands like Canon, Nikon, and Sony offer excellent options for macro lenses that cater to different budgets and camera systems. Choose a lens that suits your needs and ensures optimal image quality.
Tripod
Using a tripod is essential for macro photography because it helps eliminate camera shake and ensures stability during longer exposure times. When choosing a tripod, look for one that is sturdy, portable, and easy to adjust. Consider features like height adjustment, weight capacity, and quick-release mechanisms for convenience. Brands like Manfrotto, Gitzo, and MeFoto offer a range of tripods designed specifically for macro photography, catering to both amateurs and professionals.
Lighting
Proper lighting is crucial to achieving well-lit and detailed macro images. While natural light can be great for macro photography, it is often necessary to supplement it with artificial lighting. There are various lighting options available, such as ring lights, LED panels, and external flashes. Experiment with different lighting setups to find the one that best suits your needs and enhances the details of your macro subjects. Brands like Godox, Yongnuo, and Neewer offer reliable and affordable lighting equipment for macro photography.
By investing in the right macro photography equipment, including a quality macro lens, tripod, and lighting, you can elevate your skills and capture stunning close-up shots. With the right tools in hand, you’ll be well-equipped to explore the fascinating world of macro photography.
| Macro Photography Equipment | Features | Recommended Brands |
|---|---|---|
| Macro Lens | – Focal length – Magnification ratio – Image stabilization |
– Canon – Nikon – Sony |
| Tripod | – Sturdiness – Portability – Height adjustment – Quick-release mechanism |
– Manfrotto – Gitzo – MeFoto |
| Lighting | – Ring lights – LED panels – External flashes |
– Godox – Yongnuo – Neewer |
Capturing Stunning Close-up Shots with Macro Lens
Using a macro lens is essential for capturing detailed close-up shots in macro photography. A macro lens allows you to get up close and personal with your subject, revealing intricate details that are often unseen by the naked eye. With its unique optical design and focusing capabilities, a macro lens is specifically designed for close-up photography, making it an indispensable tool for any macro photographer.
When it comes to selecting the right macro lens, there are several factors to consider. The focal length of the lens is one of the most important considerations. Shorter focal lengths, such as 50mm or 60mm, are great for photographing small subjects like insects or jewelry, as they allow you to get close to your subject without being intrusive. Longer focal lengths, such as 100mm or 150mm, provide greater working distance, making them ideal for capturing skittish or delicate subjects.
Another important consideration is the maximum aperture of the lens. A wider maximum aperture, such as f/2.8 or f/3.5, allows for more light to enter the lens, resulting in brighter images and better low-light performance. It also gives you more control over depth of field, allowing you to create a shallow or wide focus area depending on your creative vision.
Image stabilization is another feature to look for in a macro lens. Macro photography often requires shooting at close distances, which can amplify even the slightest camera shake. Having image stabilization technology in your lens can help compensate for this, allowing you to capture sharp and blur-free images.
Here are some popular macro lenses to consider for your photography kit:
| Lens | Focal Length | Maximum Aperture | Image Stabilization |
|---|---|---|---|
| Canon EF 100mm f/2.8L IS USM Macro | 100mm | f/2.8 | Yes |
| Nikon AF-S VR Micro-Nikkor 105mm f/2.8G IF-ED | 105mm | f/2.8 | Yes |
| Sony FE 90mm f/2.8 Macro G OSS | 90mm | f/2.8 | Yes |
| Tamron SP 90mm f/2.8 Di VC USD Macro | 90mm | f/2.8 | Yes |
| Sigma 105mm f/2.8 EX DG OS HSM Macro | 105mm | f/2.8 | Yes |
Remember, choosing the right macro lens depends on your specific needs and preferences. Consider factors such as budget, brand compatibility, and the type of subjects you plan to photograph. By investing in a high-quality macro lens, you will have the tools necessary to capture stunning close-up shots and elevate your macro photography skills.
Exploring Creative Macro Composition Techniques
Creative macro composition is the key to capturing visually engaging images of the miniature world around us. In this section, we will delve into specific composition techniques designed for macro photography. By utilizing these techniques, you can take your macro photos to new heights and create captivating images that stand out from the crowd.
Using Reflectors to Enhance Your Macro Subjects
Reflectors are a valuable tool in macro photography for controlling and manipulating light to bring out the best in your subjects. By positioning reflectors strategically, you can enhance the natural highlights and shadows, adding depth and dimension to your macro shots. Experiment with different types of reflectors, such as foam boards, silver reflectors, or even a simple piece of white paper, to achieve the desired effect.
Choosing Backgrounds that Complement Your Macro Subjects
The background in macro photography plays a crucial role in highlighting your subject. Opt for backgrounds that complement and enhance the colors, textures, and shapes of your subjects. Consider using natural elements like flowers, leaves, or pebbles as backdrops, or experiment with colorful fabric, textured paper, or even reflective surfaces for a unique and eye-catching effect. Remember, the background should never overpower the subject but rather provide a harmonious backdrop that draws attention to the intricate details.
Embrace Experimentation and Unconventional Angles
Macro photography is the perfect opportunity to let your creativity run wild. Don’t be afraid to experiment with different angles and perspectives to capture unique and mesmerizing shots. Get down low to capture your subject from a bug’s-eye view, or try shooting from above to showcase intricate patterns. Step out of your comfort zone and explore unconventional techniques to capture breathtaking macro compositions that leave a lasting impression.
Remember, creativity knows no bounds when it comes to macro composition. Embrace your inner artist and let your imagination guide you.
By incorporating reflectors, selecting complementary backgrounds, and embracing experimentation, you can elevate your macro compositions to a whole new level of artistry. Emphasize the unique details of your subjects and capture captivating images that tell a story in the miniature world.
Enhancing Macro Images with Editing Techniques
Post-processing plays a crucial role in elevating your macro images to new heights. With the right editing techniques, you can enhance the sharpness, contrast, and color balance of your macro photos, bringing out the intricate details and vibrant colors of the miniature world.
One powerful editing software that can take your macro photography editing to the next level is Luminar Neo. With its advanced features and user-friendly interface, Luminar Neo offers a wide range of tools and presets tailored specifically for macro photography.
Here are some post-processing tips to enhance your macro images using Luminar Neo:
- Adjusting Sharpening: Use the sharpening tools in Luminar Neo to enhance the fine details and textures in your macro photos. Be careful not to over-sharpen, as it can lead to unnatural-looking images.
- Enhancing Contrast: Increase the contrast of your macro images to make the subject stand out and add depth to the composition. Luminar Neo provides various contrast adjustment options, allowing you to fine-tune the contrast to your liking.
- Balancing Colors: Achieving accurate and vibrant colors is essential in macro photography. Luminar Neo’s color adjustment tools enable you to fine-tune the color temperature, saturation, and hue of your macro images, ensuring they are visually appealing.
- Applying Creative Filters: Luminar Neo offers a wide range of creative filters and presets that can add unique effects to your macro images. Experiment with different filters, such as vignettes, blurs, and textures, to add artistic flair to your shots.
Remember, the goal of post-processing is to enhance your macro images while maintaining a natural and realistic look. Avoid excessive editing that can result in an unnatural appearance.
To give you a visual representation of the post-processing techniques discussed, take a look at the before-and-after example below:

“Editing is like the final brushstroke that brings your macro images to life. It allows you to enhance the inherent beauty of the subjects and create captivating visual experiences.” – Photography Enthusiast
Incorporating post-processing techniques into your macro photography workflow can significantly enhance the impact of your images. Experiment with different editing tools and presets in Luminar Neo to unlock the full potential of your macro photos.
Conclusion
In conclusion, mastering advanced macro photography techniques can take your close-up shots to new heights. By incorporating focus stacking, experimenting with composition, understanding depth of field, and utilizing the right equipment, you can capture stunning images that reveal the intricate details of the miniature world around us.
Through focus stacking, you can achieve exceptional depth of field, allowing for sharpness throughout your macro subjects. Additionally, by applying composition techniques such as the rule of thirds and exploring different angles and perspectives, you can create visually captivating images that draw the viewer’s eye.
Understanding depth of field and its relationship to aperture control is essential in macro photography. By adjusting your aperture settings, you can control the amount of sharpness or blur in your images, allowing you to emphasize specific details within your subjects.
Equipping yourself with the right gear, such as a macro lens, tripod, and appropriate lighting, is crucial for achieving optimal macro photography results. By implementing the tips and techniques shared in this article, you can elevate your macro photography skills and embark on a creative journey into the mesmerizing world of close-up photography.
FAQ
What are some advanced techniques in macro photography?
Advanced techniques in macro photography go beyond the basics and involve achieving sharp focus, managing depth of field, utilizing focus stacking, using the right equipment, lighting techniques, and composition principles.
How can I achieve sharp focus in macro photography?
To achieve sharp focus in macro photography, you can use techniques such as focus stacking, manual focus, a tripod for stability, and techniques for reducing camera shake. Extension tubes, ring flashes, and diffusers can also enhance your macro photography skills.
How can I control depth of field in macro photography?
Depth of field in macro photography can be controlled by adjusting the aperture settings. Using a narrower aperture (higher f-number) will result in a greater depth of field, while a wider aperture (smaller f-number) will create a shallow depth of field.
What are some composition techniques for macro photography?
In macro photography, you can use composition techniques such as the rule of thirds, leading lines, negative space, and experimentation to create visually captivating images that highlight the intricate details of your subjects.
What are some tips for successful macro photography?
Some tips for successful macro photography include being patient and observing your subject’s behavior, shooting during the golden hours of sunrise or sunset, using bracketing exposure, and using post-processing software to enhance your macro images.
What is focus stacking in macro photography?
Focus stacking is a powerful technique in macro photography that involves capturing multiple images at different focal points and merging them to achieve a greater depth of field. It helps in capturing sharp and detailed macro images.
What equipment do I need for macro photography?
Essential equipment for macro photography includes macro lenses, tripods, and lighting equipment. Choosing the right equipment is crucial to enhance your macro photography techniques.
How do I choose the right macro lens?
When selecting a macro lens, consider factors such as focal length, image stabilization, aperture range, and compatibility with your camera. The right macro lens can elevate your macro photography skills and capture detailed close-up shots.
How can I create creative macro compositions?
To create creative macro compositions, you can use techniques such as reflectors and backgrounds to enhance the appearance of your subjects. Experimentation with different angles and perspectives is also key in macro composition.
How can I enhance my macro images through editing?
Editing software, such as Luminar Neo, can greatly enhance your macro images. You can use it to enhance sharpness, contrast, and color balance in your macro photos.
What are some advanced macro photography techniques?
Advanced macro photography techniques go beyond the basics and involve achieving sharp focus, managing depth of field, utilizing focus stacking, using the right equipment, lighting techniques, and composition principles.