Struggling to capture the tiny wonders of the world in breathtaking detail? Macro photography transforms small subjects into life-sized masterpieces. This comprehensive guide will walk you through everything from choosing the right equipment to perfecting your technique, ensuring every shot is stunningly clear and full of life.
Get ready to dive deep!
Key Takeaways
- Macro photography turns tiny things into life-sized masterpieces by using special equipment like macro lenses, extension tubes, and close-up filters to capture amazing detail.
- Choosing the right camera and lens is important. Both DSLR and mirrorless cameras are good choices, but you need to decide between a full-frame or crop-sensor camera based on what you want to shoot.
- Lighting is key for getting great macro shots. You can use natural light, flashlights, or professional equipment. Reflectors and diffusers help control shadows and highlight details.
- DIY tools can save money. Homemade reflectors made from aluminum foil or LED strips for even lighting are creative alternatives to expensive gear.
- Practice makes perfect in macro photography. Using different settings, experimenting with lighting angles, and trying unique compositions will improve your skills over time.
Understanding the Basics of Macro Photography

Macro photography brings tiny worlds to life, magnifying details invisible to the naked eye. It’s all about getting close and personal with your subject, capturing beauty in the miniature.
Definition of Macro Photography
Macro photography transforms the small and overlooked into the large and captivating. It’s a technique that magnifies subjects, making them appear bigger in your photos than they do in real life.
This unique form of photography opens up a world where textures, colors, and details come alive, presenting everyday items in an extraordinary light.
For those diving into this art, understanding how macro photography works is crucial. By using specialized lenses or equipment like extension tubes and close-up filters, photographers can get close to tiny subjects.
This closeness allows for capturing images with incredible detail—revealing a side of the world often unseen by the naked eye. Through macro photography, enthusiasts explore beyond traditional boundaries, turning simple subjects into stunning visuals full of wonder and intrigue.
Magnification
Magnification is key in macro photography. It lets you capture the tiniest details at close range, making them appear larger than life. Think of it as using a magnifying glass to zoom in on an ant, revealing patterns and textures invisible to the naked eye.
The goal is to achieve a magnification ratio of 1:1 or greater. At this ratio, your subject appears as large on your camera sensor as it does in real life.
Lenses designed for macro shots can reach these high magnification levels without losing sharpness or detail. They also minimize chromatic aberration, ensuring colors stay true around the edges of your subject.
Next up, let’s tackle working distance and why it matters in getting those perfect close-up shots.
Working Distance
Working distance in macro photography is all about how far your camera needs to be from the subject to get a sharp focus. It’s crucial because it affects everything from the angle you shoot to the level of detail you can capture.
Longer focal length lenses give you more room to work with, letting you snap detailed shots without getting too close and potentially disturbing your subject. This distance plays a big part in achieving that perfect magnification and composition for stunning macro photos.
Understanding this concept helps photographers plan their shots better, especially when working with live subjects or in tight spaces. A greater working distance allows for more flexibility in lighting and framing, making it easier to create those breathtaking close-up images with a shallow depth of field or bokeh effect.
So, always consider the working distance of your lens before diving into your next macro photography project—it could be the difference between a good shot and a great one.
Essential Equipment for Macro Photography

To dive into the world of macro photography, you’ll need some key gear. Think cameras that can capture crisp, close-up details and specialized lenses designed to magnify the smallest subjects.
Best Cameras for Macro Photography: DSLR vs Mirrorless
Choosing the right camera is a pivotal step in mastering macro photography. Here’s a detailed comparison between DSLR and Mirrorless cameras to help you make an informed decision:
| Feature | DSLR | Mirrorless |
|---|---|---|
| Viewfinder | Optical, allowing for a direct view through the lens with no lag | Electronic, offers focus peaking and real-time exposure preview |
| Battery Life | Generally longer due to less dependence on electronic displays | Shorter, as electronic viewfinders and screens consume more power |
| Size and Weight | Larger and heavier, can be more stable for macro shots | Compact and lightweight, easier for hand-held shots and travel |
| Autofocus Speed | Fast autofocus, though can vary by lens | Often faster and more accurate in live view and video modes |
| Lens Availability | Wide range of macro lenses available | A growing selection, of adapters available for DSLR lenses |
| Price | A growing selection, adapters available for DSLR lenses | Generally more expensive, but prices are becoming more competitive |
| Magnification Potential | High, especially with dedicated macro lenses and accessories | Equal potential, especially with focus stacking features |
Both DSLRs and mirrorless cameras have their strengths for macro photography. The choice ultimately depends on your specific needs, preferences, and shooting style. Consider what features are most important to you—whether that’s the tactile experience of an optical viewfinder or the advanced technology of an electronic one. Remember, great macro photography can be achieved with either type of camera, so focus on honing your skills and creativity.
Full-Frame vs Crop-Sensor
After exploring the differences between DSLR and mirrorless cameras for macro photography, let’s delve into another crucial decision: whether to opt for a full-frame or crop-sensor camera. Each type has its unique advantages, making them suitable for various macro photography scenarios.
| Feature | Full-Frame | Crop-Sensor |
|---|---|---|
| Image Quality | Superior, with better low-light performance. | High-quality, though slightly less optimal in low light. |
| Field of View | Wider, offering a true representation of lens’ focal length. | Narrower, effectively extending the lens’ focal length. |
| Depth of Field | Shallower, ideal for isolating subjects. | Deeper, making it easier to get more of the subject in focus. |
| Price | Generally higher, due to advanced imaging capabilities. | More affordable, making it accessible for beginners. |
| Size and Weight | Larger and heavier, can be a consideration for field work. | Compact and lighter, beneficial for handheld shooting and travel. |
Both full-frame and crop-sensor cameras offer significant benefits for macro photography. Your choice depends on your specific needs, such as image quality, budget, and portability. Full-frame cameras excel in producing high-quality images, especially in challenging lighting conditions. Crop-sensor cameras, however, provide an effective magnification of your subjects and are a more budget-friendly entry point into macro photography. Understanding these differences ensures you select the most suitable camera for capturing the intricate details of your macro photography subjects.
Canon vs Nikon
Transitioning from the discussion on full-frame vs. crop-sensor cameras, it’s crucial to touch on another hotly debated topic in the photography world: Canon vs Nikon. Both brands have fiercely loyal followings and offer an array of equipment suited for macro photography. Let’s dive into some of the specifics to see how they stack up against each other in the realm of macro photography.
| Feature | Canon | Nikon |
|---|---|---|
| Macro Lens Options | Canon EF 100mm f/2.8L IS USM, among others | Nikon AF-S Micro-NIKKOR 105mm f/2.8G, among others |
| Reliability | High | High |
| Image Quality | Exceptional with accurate colors | Sharp with excellent detail |
| AutoFocus Performance in Macro | Fast and quiet, particularly in L series lenses | Accurate with minimal hunting, especially with VR lenses |
| Price Range for Macro Lenses | Varies, with options for both budget and premium markets | Similarly varied, catering to hobbyists and professionals alike |
| User Experience | Intuitive interfaces, making them ideal for beginners and pros | Customizable settings which may appeal more to seasoned photographers |
| After-Sales Support | Widely regarded as helpful and comprehensive | Equally reputed for its quality customer service |
Both Canon and Nikon provide reliable equipment for achieving high-quality macro photography, each with their strengths. Canon’s offerings are known for their intuitive use and stellar image quality, making them a solid choice for photographers at any skill level. Nikon, on the other hand, often features highly customizable settings and sharp imaging, catering especially well to those with more experience. Regardless of your choice, both brands offer a range of macro lenses that are capable of capturing stunning close-up shots, such as the Canon EF 100mm f/2.8L IS USM and Nikon AF-S Micro-NIKKOR 105mm f/2.8G.
Choosing the Best Lenses for Macro Photography
Picking the right macro lens is key for capturing stunning close-up shots. Your choice affects everything from reproduction ratio to depth of field and image quality. Look for lenses with a high magnification ratio to catch fine details vividly.
Also, consider lenses designed to minimize chromatic aberration for clearer, more vibrant photos.
Many photographers prefer lenses that offer a 1:1 magnification ratio—ideal for life-size reproductions of your subject on the sensor. Flexible apertures are essential too; they let you play with depth of field to either isolate your subject or keep everything sharp.
Always check reviews before buying to find a lens that matches your macro photography goals without compromising on quality.
Using Extension Tubes and Close-Up Filters for Macro Photography
Extension tubes and close-up filters are your best friends in macro photography. They help you get closer to your subjects, magnifying tiny details that the naked eye might miss.
- Extension tubes fit between your camera body and lens. They don’t have optics but move the lens farther from the sensor. This increases magnification by allowing you to focus much closer than usual.
- Using extension tubes means no loss in image quality since there are no extra glass elements involved. However, they do reduce the amount of light reaching the sensor, impacting exposure times.
- You can stack multiple extension tubes together for even greater magnification. Just know that the more tubes you add, the harder it becomes to light your subject properly.
- Close-up filters screw onto the front of your lens, like a regular filter. They act like a magnifying glass, letting you focus closer than your lens normally allows.
- Unlike extension tubes, close-up filters can affect image quality slightly because they introduce another glass element between your subject and the camera sensor.
- Close-up filters come in different strengths, measured in diopters. Higher diopter numbers provide more magnification but can make focusing and composing shots more challenging.
- Combining both extension tubes and close-up filters can lead to incredible macro photographs with extreme levels of detail—think about photographing the individual scales on a butterfly’s wing!
- Remember to adjust your aperture when using these accessories for macro photography; the depth of field becomes very shallow at such close focusing distances.
- Experiment with different lengths of extension tubes and strengths of close-up filters until you find what works best for your specific needs and subjects.
Introduction to Macro Photography Equipment and Basics
Diving into the world of macro photography opens up a universe where tiny subjects loom large, turning everyday objects into fascinating focal points. To start this journey, you’ll need the right equipment—and understanding its basics is crucial for capturing those magnified moments effectively.
A macro lens with a 1:1 magnification ratio, which allows sharp focus within about 12 inches from your subject, stands as an essential tool in your kit. While digital SLR cameras have long been the go-to for many macro photographers due to their versatility and range of compatible lenses, mirrorless cameras are gaining ground for their compactness and equally compelling image quality.
Selecting between full-frame or crop-sensor cameras involves weighing considerations like depth of field and working distance—factors that can dramatically affect your final image.
Crop sensors extend the effective focal length of lenses, giving extra reach at closer distances without sacrificing quality. Meanwhile, accessories such as ring flashes and reversing rings enhance lighting conditions and allow reverse mounting of a lens to achieve greater magnification levels respectively.
Each piece of equipment plays its role in mastering macro photography by bringing minuscule worlds to life with vivid detail and clarity.
Budget Equipment Tips for Macro Photography
You don’t need to break the bank for macro photography. Start by using groceries like berries as subjects—they’re affordable and great for practice. A reversing ring is a game-changer; it lets you mount your lens backward on the camera, giving you that coveted macro effect without spending hundreds on a new lens.
For lighting, think outside the box. Use a flashlight or even sunlight streaming through a window instead of investing in expensive flashes or ring lights right away. Natural light can create stunning effects with just a bit of creativity and positioning.
Ready to improve your setup? Explore DIY solutions for enhancing your macro photography lighting and backgrounds next.
DIY Solutions for Macro Photography Lighting and Backgrounds
Macro photography transforms the tiny world into stunning images. It’s surprising how ordinary items around your house can play a vital role in creating captivating photos.
- Natural Light: Find a well-lit spot near a window. Use sheer curtains to diffuse harsh sunlight, softening shadows and highlighting details in your subject.
- Homemade Reflectors: Wrap aluminum foil around cardboard for a makeshift reflector. This setup bounces light back onto your subject, brightening dark areas and enhancing texture.
- DIY Diffusers: Stretch white fabric over a frame—think old picture frames or embroidery hoops—to make a simple diffuser. Place it between the light source and your subject to soften light and reduce glare.
- Colored Backgrounds: Grab colorful fabrics, papers, or even painted canvases to use as backgrounds. These can add contrast or complement your subject beautifully.
- Creating Shadows with Objects: Use everyday objects like plants or cutouts to cast shadows on your subject. This technique adds depth and interest to your shots.
- Desk Lamps for Lighting: Position desk lamps around your subject to illuminate it from different angles. Experiment with bulbs of various temperatures for cool or warm lighting effects.
- LED Strips: Attach LED strips to the inside of a box to create an even, soft light all around your subject—perfect for shiny or reflective objects.
- Bokeh Backgrounds with Lights: Create dreamy bokeh by placing Christmas lights behind your subject at a distance. The result? A magical backdrop that makes your main focus pop.
- Handheld Torch for Focused Light: Shine a handheld torch on specific parts of the subject you want to highlight, giving you precise control over the look of your shot.
- Outdoor Enhancements: Take advantage of the golden hour—the time just after sunrise or before sunset—for naturally soft and golden lighting that’s ideal for macro photography outdoors.
Using Reflectors and Diffusers in Macro Photography
Crafting your lighting and backgrounds offers a great foundation, but refining these elements with reflectors and diffusers can take your macro photography to the next level. Reflectors bounce light back onto your subject, illuminating dark shadows and revealing hidden details.
This simple action dramatically improves image quality by balancing the light distribution. Diffusers, on the other hand, soften harsh lights. They ensure that the light falling on your subject isn’t too intense, which helps in capturing textures without washing out subtle features.
Using both tools effectively controls harsh shadows and creates soft, even lighting essential for highlighting intricate details of close-up subjects. The ability to manage and modify natural or artificial light allows photographers to achieve that perfect shot even under challenging conditions—bringing out colors, textures, and shapes like never before.
Not only do these tools enhance detail quality; but they also contribute significantly to the overall mood of your macro photographs. Whether you’re shooting tiny insects or delicate flowers, integrating reflectors and diffusers will help you master the art of creating beautifully lit images that stand out.
Lighting Techniques for Macro Photography
Lighting plays a pivotal role in macro photography. It’s not just about having enough light but using it creatively to highlight the beauty of your subject. Ring flashes and diffusers are tools of the trade for producing even, soft lighting that reduces harsh shadows and brings out fine details in extreme close-ups.
These gadgets help maintain the necessary small aperture and slow shutter speed combination without boosting ISO too high.
Experimenting with side lighting can also reveal textures and depth often missed by direct flash. It adds drama and dimension, making an ordinary subject look extraordinary. Play around with natural light whenever possible; early morning or late afternoon offers a softer, more directional light perfect for macro shots.
Reflectors become handy here, bouncing back sunlight into shadowed areas on your subject, ensuring every detail is well-lit. Always aim for a balance between creativity and technicality to achieve stunning macros that stand out.
Composition and Framing in Macro Shots
Mastering composition and framing in macro photography opens a world of creativity. The rule of thirds is your friend here, guiding you to place your subject in a way that naturally draws the eye.
Imagine dividing your shot into nine equal parts with two horizontal and two vertical lines; now, position the main elements where these lines intersect. This technique creates balance and invites viewers to explore your image more deeply.
Framing requires thoughtful consideration of how the subject fits within the boundaries of your viewfinder or screen. Use negative space wisely to highlight the focal point, and experiment with leading lines to guide the viewer’s gaze towards it.
Pay attention to the background too—selective focus can blur distractions, making your subject stand out sharply against a softened backdrop. Depth of field plays a crucial role; adjusting f-number settings lets you decide what gets emphasized through sharpness.
As we delve further into techniques for capturing tiny wonders, remember each choice you make—from lens selection to aperture setting—shapes the story told by your photograph. Ready for more tips on mastering this art? Let’s talk about top tips for excelling in macro photography next.
Top Tips for Mastering Macro Photography
Discovering the little details in a big world takes skill, but with the right approach, you can capture them beautifully in macro photography. Dive into these top tips to enhance your shots and bring tiny wonders to life.
Choosing a Suitable Subject
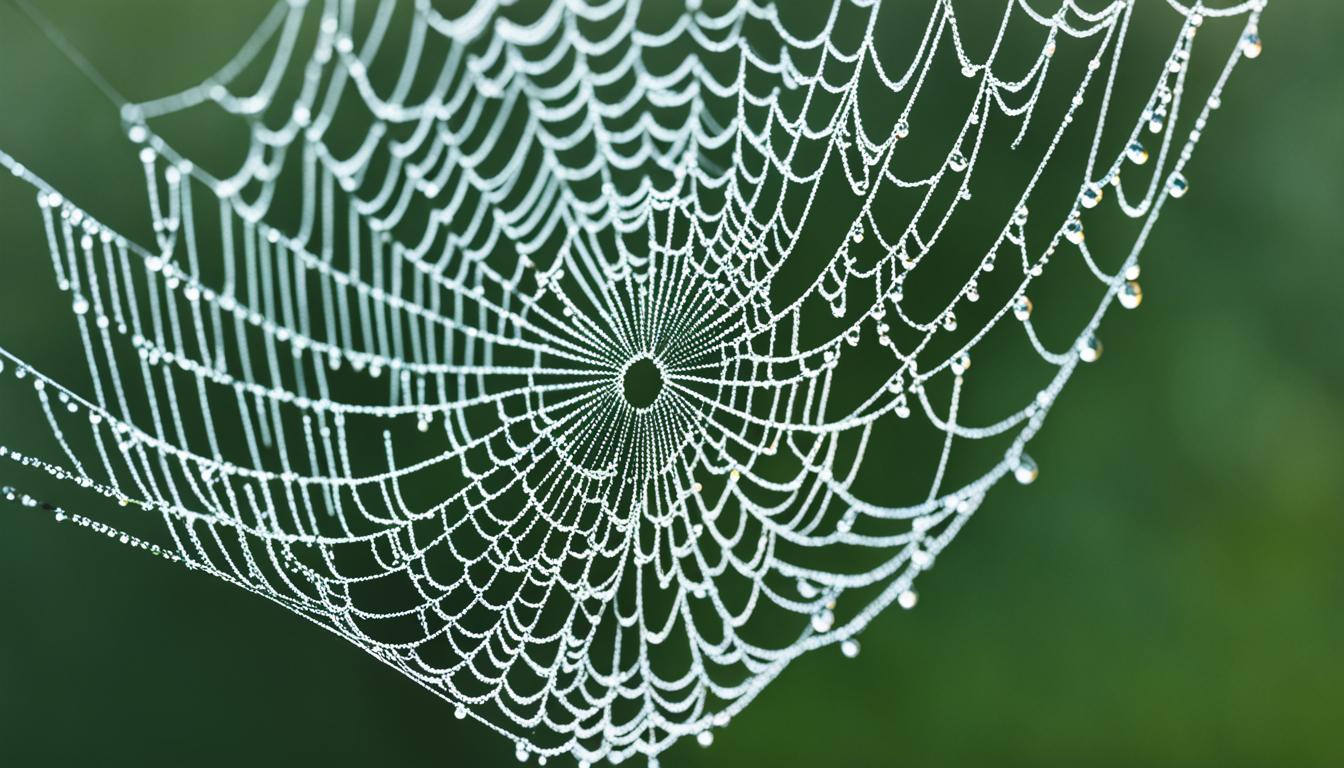
Choosing the right subject is key in macro photography. Look for details and textures that catch your eye. This could be the intricate patterns on a leaf, the dew on a spider web, or the vibrant colors of a butterfly’s wing.
Each offers a unique opportunity to showcase beauty that’s often overlooked.
Subjects like plants and insects are popular choices among nature photographers. Their small size makes them perfect for close-up photography. However, don’t limit yourself—everyday objects can also transform into stunning subjects under the macro lens.
Experiment with different materials and shapes to find what stands out visually.
Picking the Best Location and Weather
Finding the right location is key for stunning macro photography. Look for places with a variety of subjects, like gardens full of insects and flowers or a forest floor rich in textures and patterns.
Aim for soft, natural light—early morning or late afternoon offers the best conditions. This light brings out details without harsh shadows.
Weather also plays a big role. Overcast days can be perfect, providing even lighting that enhances colors and reduces glare on your subjects. Always plan by checking the weather forecast to avoid rainy days unless you’re going for water droplet shots which can add an interesting detail to your photos.
Next up, let’s discuss how stabilizing with a tripod can improve your macro shots.
Stabilizing with a Tripod
To nail those perfect macro shots, a sturdy tripod is your best friend. It cuts down on any unwanted camera shake and lets you frame your subject just right. Look for one with adjustable legs and a ball head to get into those hard-to-reach angles, especially when shooting close to the ground.
A tripod with a horizontal center column becomes invaluable for ground-level photography, allowing you to meet your tiny subjects at eye level.
Combining the stability of a good tripod with a remote shutter release or the camera’s self-timer further minimizes vibrations. This setup is crucial for capturing sharp images in macro photography where even the slightest movement can blur your shot.
Precise framing and composition become much easier, letting you focus on creativity rather than wrestling with instability.
Using a Longer Focal Length for Living Subjects
Choosing a longer focal length like 100mm or 150mm is a game-changer for snapping shots of living subjects. It lets you keep a good distance, so you don’t scare them away. This way, animals and insects stay calm while you capture their details.
The background also turns blurry in a beautiful way, making your main subject stand out sharply.
Working with these lenses might require more light, but the results are worth it. Your pictures will have less clutter and focus more on the subject. Plus, that smooth background blur or bokeh makes everything look professional.
Keep in mind, higher-end macro lenses cost more—so plan according to your budget.
Customizing your background
Customizing the background in your macro photographs can transform an okay image into a stunning one. By selecting backgrounds with contrasting colors or textures, you create depth and make your subject stand out.
Think about using fabric, paper, or even natural elements to add a unique touch. A neutral backdrop might be all you need to draw attention directly to your main subject.
Adding colored gels to flashes introduces custom effects easily. This technique allows you to experiment with different hues and intensities, setting the mood for your shots. Keep in mind that the right background not only isolates your subject but also enhances the composition of your entire photo.
So, play around with various background materials and colors until you find what elevates your macro photography from good to great.
Paying Attention to Depth of Field
After setting the perfect background, the focus shifts to mastering depth of field for impactful macro shots. A narrow aperture is key in achieving a sharp subject with a beautifully blurred backdrop.
This demands using settings like a slow shutter speed, bright lighting, or higher ISO values. Macro lenses are special because they focus closely on subjects. But this also means they have a very shallow depth of field.
You’ll need to adjust your camera lens carefully to capture every detail.
To get it right, start by selecting the smallest entrance pupil diameter on your macro focusing lens. It helps in maximizing sharpness across your subject while keeping the background out of focus.
Experiment with different focal lengths and apertures until you find the perfect balance for your shot. Remember, every small adjustment can dramatically change how your photo looks and feels.
Creating Better Lighting
Achieving the right depth of field is crucial, but without proper lighting, your macro photography might fall flat. Ring flashes and diffusers are excellent tools for ensuring your subject is evenly lit.
These gadgets help avoid harsh shadows that could obscure details. They illuminate the scene from all directions, providing a soft light that enhances texture and color.
Experiment with different angles of light to discover what best showcases your subject’s unique features. Side lighting can reveal intricate textures, while backlighting creates a dramatic effect by highlighting edges and shapes.
Remember, in macro photography, even the tiniest change in lighting can make a big difference in how your photo looks and feels. Always adjust your setup until you find the perfect balance that brings out the best in whatever you’re shooting.
Planning Your Point of Focus
In macro photography, the plane of focus is incredibly narrow. This means even tiny movements can completely shift where your image is sharp. Planning your shot and deciding on a focal point are key steps to avoid blurriness.
You need a macro lens with a 1:1 ratio for this precision. It lets you keep a sharp focus within the critical 12-inch macro range.
Setting up your camera right requires understanding how slight adjustments affect your photo’s clarity – especially when close-up filters or extension tubes are in play. Get familiar with these tools but remember, it’s all about where you choose to focus that defines the quality of your macro shots.
Now let’s explore the exciting world of lighting techniques in macro photography, which will bring those details into perfect view.
Macro Photography Safety: Working with Live Subjects
Capturing live subjects in macro photography presents unique challenges. You must respect the creature’s space and well-being while trying to get that perfect shot. Move slowly to avoid startling insects or small animals.
This approach not only keeps them calm but also helps you maintain focus on your subject for a clearer image.
Wear protective clothing if you’re venturing into areas with potentially harmful plants or insects. Gloves and long sleeves can protect against scratches and bites. Remember, safety is paramount—not just for you, but for the subjects of your photographs as well.
Keep interactions gentle and minimal to ensure their natural behavior remains undisturbed by your presence.
Capturing Movement in Macro Photography: Techniques and Challenges
Freezing movement in macro photography brings life to your images but comes with its own set of hurdles. To get that perfect shot, you’ll need fast shutter speeds and great lighting.
Fast shutter speeds stop the action, making it seem as if time stands still. Brilliant lighting is crucial too—it ensures your subject is well-lit and details are crisp. Sometimes, you may even need to bump up the ISO for sharper images without blur.
Using a tripod stabilizes your camera, letting you focus precisely on tiny subjects in motion like insects or falling droplets. This technique also reduces camera shake—a common problem when shooting close-ups.
For more flexibility, try handheld shots with image stabilization enabled on your lens or camera body. Remember, capturing movement requires patience and practice; don’t get discouraged by initial failures—each attempt brings you closer to mastering this exciting aspect of macro photography.
Water Droplet Macro Photography Techniques and Tips
Capturing water droplets through macro photography can turn a simple moment into a striking image. For this, ensure your subject is no larger than 24 mm vertically to fit the camera’s viewfinder perfectly.
Use macro lenses designed to control chromatic aberration for sharp details in those tiny droplets.
Lighting plays a crucial role in elevating the beauty of water droplets. Difficulties arise due to the proximity required for these shots, but employing ring flashes or diffusers effectively tackles uneven lighting issues.
Experiment with different angles and lighting setups to find what best highlights the intricate patterns and reflections within each water drop.
Next up, explore how adding textures and patterns can bring creative flair to your macro photography.
Creative Macro Photography Ideas: Textures and Patterns
Moving from capturing the delicate dance of water droplets, let’s dive into the world of textures and patterns through macro photography. This genre opens a door to seeing ordinary objects in extraordinary ways.
Fabrics reveal intricate weaves; leaves display mesmerizing vein patterns. Even rust on metal transforms into a landscape of color and texture under the close gaze of a macro lens.
Each shot offers a unique perspective, turning everyday items into works of abstract art.
Exploring your surroundings with a macro lens unveils patterns and textures you would normally overlook. The bark on a tree becomes an epic tale etched in grooves and lines, while grains of sand turn into vast deserts when viewed up close.
By focusing on these details, you craft images that not only capture beauty but also stimulate curiosity about the small wonders hidden in plain sight. Through creativity and observation, every photographer can transform the mundane into the magnificent with just their camera and an appreciation for detail.
Macro Photography of Everyday Objects
Everyday objects transform into stunning subjects under the macro lens. Groceries like berries suddenly reveal a world of texture and color that’s usually invisible to the naked eye.
This type of photography turns the mundane into the magnificent, highlighting details we often overlook.
You don’t need fancy equipment to start capturing these close-up wonders. A compact camera or even a smartphone with a macro lens can work miracles on everyday items sitting around your house.
With patience and practice, photographers can uncover patterns, textures, and colors that breathe new life into ordinary objects.
Macro Photography in Nature: Plants and Insects
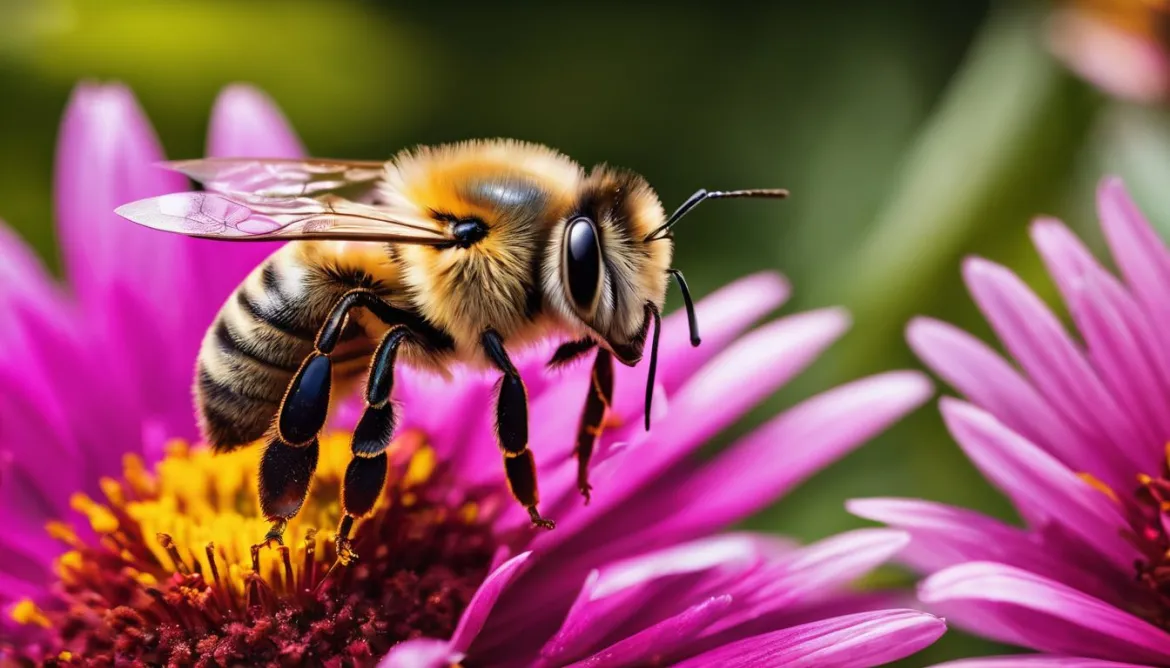
Shifting focus from the man-made to the marvels of nature, macro photography offers a unique perspective on plants and insects. This style captures the beauty and complexity of natural subjects up close.
You get to reveal details invisible to the naked eye—tiny hairs on a bee’s body or dewdrops on a spiderweb that look like sparkling jewels.
Capturing these subjects requires some specific techniques. For instance, choosing the right time for outdoor shoots is crucial. Early morning or late afternoon provides soft, natural light that enhances textures and minimizes shadows.
Depth of field becomes key in getting your subject sharp while keeping the background blurred out beautifully—a small aperture and slow shutter speed can do wonders here. Remember, stability is everything; even a slight breeze can turn into a challenge when photographing delicate subjects like flowers or moving insects.
A tripod goes a long way in keeping your camera steady for those perfect shots.
Tips for Handheld Macro Photography
Capturing the intricate details of nature can be breathtaking, but it’s equally challenging without a tripod. Handheld macro photography offers freedom and flexibility, allowing photographers to explore different angles effortlessly.
A key tip is using a macro lens with a 1:1 ratio to ensure sharp focus within the 12-inch macro range. This setup helps in getting up close with subjects like plants and insects, making every detail pop.
For those aiming for precision despite the absence of tripods, steady hands are crucial. Holding your breath right before taking a shot reduces camera shake, ensuring clearer images.
Additionally, opting for lenses designed for APS-C or full-frame cameras improves image quality due to their higher pixel density and sensor format compatibility. These small techniques make a significant difference in handheld shots—transforming simple pictures into striking photomacrography masterpieces.
Editing Macro Photography Images
Editing your macro photography images can transform a good shot into an amazing masterpiece, revealing hidden details and enhancing colors like never before.
Cropping Your Image
Cropping your image is a powerful tool in macro photography. It helps you focus on the main subject by cutting out distractions. This step can dramatically enhance the visual appeal of your photo, making intricate details pop and creating a stronger impact.
By adjusting the composition and framing through cropping, you elevate the aesthetic and storytelling elements of your photograph.
Mastering cropping principles allows for significant improvements in the look of your macro images. You learn to highlight key features while removing unnecessary parts that don’t contribute to the story or beauty you want to convey.
Through thoughtful cropping, photographers can achieve a more compelling image that captures viewers’ attention and showcases their skill in post-processing techniques like Adobe Photoshop.
Adjusting Colors
After trimming your photo to perfection, diving into color adjustment can breathe new life into your macro images. The tools available in Adobe Lightroom and Photoshop give you the power to tweak saturation, hue, and luminance with precision.
This process isn’t just about making colors pop—it’s about creating a mood that speaks volumes. Adjusting the white balance is critical for showing off the real beauty of your subject by ensuring colors are true to life.
Understanding color temperature helps set the right atmosphere in your shots, whether you’re aiming for warm sunsets or cool shade effects. Color grading then takes your photographs to another level, establishing a consistent look that ties your work together.
By mastering these techniques, you’ll transform good photos into great ones—capturing not just an image but an experience.
Altering Exposure
Exposure adjustment is crucial in macro photography to bring out the details of your subject. Since macro lenses can create a very shallow depth of field, getting the right exposure helps keep your subject sharp while smoothly blurring the background.
Play with your camera’s ISO, shutter speed, and aperture to find the perfect balance for each shot. Lower ISO values produce cleaner images but may require more light or slower shutter speeds.
Fine-tuning these settings allows you to handle tricky lighting conditions often faced in close-up shots. For example, using a slow shutter speed lets more light hit the sensor, brightening your image without having to widen the aperture too much—which could throw off your depth of field.
Remember, external lights like ring flashes or diffusers come in handy when natural light isn’t enough for a clean exposure.
Next up: fine-tuning contrast for dynamic results.
Fine-tuning Contrast
Adjusting the exposure of your macro photography images often leads to the next step: fine-tuning contrast. This process helps in highlighting details and textures, vital in capturing captivating close-ups.
Contrast adjustment can make or break an image by either adding depth or making it appear flat.
To get it right, gently increase contrast to enhance separation between light and dark areas without losing detail. Sliders in editing software like Adobe Photoshop make this task straightforward.
Aim for a balance where your main subject stands out but still retains its natural look. This technique is especially helpful when you’re aiming to showcase the intricate patterns and textures found in nature, ensuring every tiny detail contributes to the overall impact of your shot.
Sharpening Your Image
Once you’ve fine-tuned the contrast, it’s time to sharpen your image. This step brings out the details that make macro photos pop. Use editing software like Adobe Photoshop or Lightroom for this.
You’ll notice how edges and textures become more defined, giving your picture a crisp finish.
Sharp images catch the eye, especially in macro photography where details matter. Start with a mild sharpening effect and adjust until you achieve clarity without making the photo look unnatural.
This ensures your subjects stand out with precision, showcasing the beauty of macro photography at its best.
Post-Processing Macro Photos: Detail Enhancement and Noise Reduction
After sharpening your macro photography images, the next step focuses on bringing out intricate details and minimizing distractions like noise. Detail enhancement allows you to emphasize textures and patterns that make macro shots captivating.
Use software tools to adjust clarity and texture sliders for this purpose. These adjustments reveal hidden characteristics in subjects, such as the delicate veins of a leaf or fine lines on an insect’s wing.
Noise reduction is equally crucial in maintaining image quality, especially when shooting in low light conditions or at high ISO settings often used in macro photography. Digital cameras tend to introduce grainy textures called noise under these circumstances.
By applying noise reduction techniques during post-processing, you can achieve smoother backgrounds and sharper subjects without compromising essential details. This process ensures your macro photos look clean and professional, ready for sharing with fellow photography enthusiasts or displaying in your portfolio.
Focus Stacking for Greater Depth of Field in Macro Images
Focus stacking is a game-changer in macro photography. It merges multiple photos to create one image with incredible depth of field.
- Start with the Right Equipment: Use a tripod to keep your camera steady. Choose a macro lens for sharp, close-up shots. Remember, stability is key.
- Choose Your Subject Wisely: Pick something that won’t move much. Flowers or inanimate objects are perfect for practicing focus stacking.
- Set Your Camera: Shift to manual focus and aperture priority mode. This keeps the exposure consistent across all shots.
- Take Multiple Photos: Move the focus point slightly between each shot. You’ll need several images covering every part of your subject from front to back.
- Use Software for Stacking: Adobe Photoshop and Lightroom are popular choices for focus stacking. These programs blend your images into one detailed photo.
- Adjust Settings as Needed: Each layer might need slight tweaks. Pay attention to alignment and sharpness in every area.
- Practice Makes Perfect: Don’t get discouraged if your first attempts aren’t perfect. Every try teaches you more about your equipment and technique.
Frequently Asked Questions about Macro Photography
Many people ask what equipment they need to start macro photography. The answer often points towards using a DSLR or mirrorless camera paired with a macro lens that offers 1:1 magnification.
This setup allows photographers to capture their subjects in sharp focus, showing details not visible to the naked eye. Essential gear also includes tripods for stability and possibly extension tubes or close-up filters for even closer shots.
Another common question revolves around finding perfect subjects for macro shots. Look around you – nature is full of tiny wonders waiting to be photographed. Insects, plants, and water droplets make excellent subjects due to their intricate textures and patterns.
Remember, lighting plays a crucial role too. Utilize natural light when possible or consider additional accessories like ring lights or twin flashes if shooting indoors.
Now let’s explore how editing can enhance your macro photography images further.
Conclusion
Diving into macro photography opens up a world of tiny wonders, right at your fingertips. With the right lens and some patience, you’ll capture images that make small things look grand.
Remember, practicing those shots in different lights and angles brings out hidden details. Every bug, flower, or water droplet has a story—your camera tells it. Let’s start snapping and create some magic!
Can Macro Photography Portfolio Help in Mastering the Art of Macro Photography?
A crafting macro photography portfolio can be a powerful tool for mastering the art of macro photography. It allows photographers to showcase their best work, track their progress, and identify areas for improvement. By curating a portfolio, photographers can gain a deeper understanding of their own style and technique.
FAQs
1. What is macro photography?
Macro photography, often referred to as macro photography or photomicrography in professional circles, gets you up close and personal with small subjects. Think of it like using a magnifying glass to see details you’d otherwise miss—like the tiny hairs on a bee or the intricate patterns on a butterfly’s wings.
2. Can I do macro photography with any camera?
Yes and no. While compact digital cameras and even your phone can capture close-up shots, true macro photography usually requires specific gear such as a telephoto lens, close-up lenses, or a macroscope for those crystal-clear details. Cameras with micro four-thirds systems are also popular for their versatility in this genre.
3. How does sensor size affect macro photography?
Sensor size matters—a lot! Full-frame sensors (or full frame FX) found in pricier DSLRs offer superior image quality and detail over smaller sensors found in many digital compact cameras. The larger the sensor, like those full frames or even medium formats, the better they are at capturing all those tiny details without losing clarity.
4. What are some essential tools I need for stunning macro shots?
Besides your camera and preferred macro lens (telephoto lens or perspective control lens), consider accessories that enhance precision: think tripod for stability; remote shutter release to avoid shakes; and perhaps lighting tools such as ring flashes. Some photographers might opt for specialized equipment like Lensbaby lenses for creative effects.
5. Does focus matter more in Macro Photography?
Absolutely! When you delve into the world of extremely small subjects, getting that razor-sharp focus becomes crucial because even slight movements can throw off your shot’s clarity drastically—and nobody likes blurry photos). Using manual focus allows finer control than auto-focus systems might achieve tight spots.
6. What’s one secret pro tip for beginners?
Experimentations The key—don’t be afraid to play around with settings, angles, And lighting until you get just the right shot. Sometimes, what feels Like A mistake could lead To A breathtaking photo. Remember, patience And persistence Are Your best friends In Macro Photography.