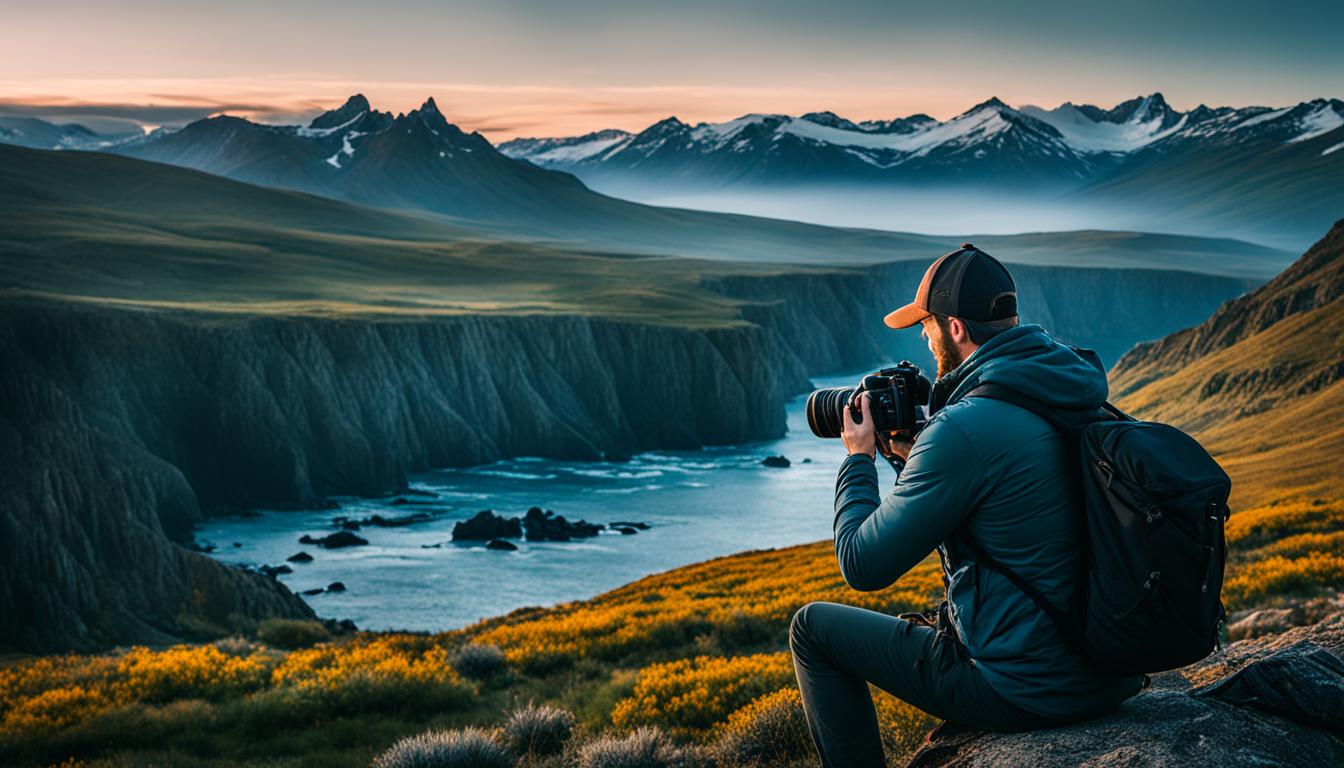
Struggling to capture the beauty of a sweeping landscape in your photographs? You’re not alone. Landscape photography enchants with its promise of capturing nature’s majesty, yet it challenges even seasoned photographers.
This article breaks down essential techniques and tips to transform your outdoor shots from good to breathtaking. Let’s dive in.
Key Takeaways
- Use quality camera equipment like DSLRs or mirrorless cameras with a wide-angle lens and polarizing filters to catch detailed and colorful landscape photos.
- Master manual exposure by adjusting shutter speeds, apertures, and ISO settings for creative control over your images. Practice changes your photo’s light, depth of field, and motion blur.
- Good lighting is essential. Shoot during the golden hour after sunrise or before sunset for soft light that makes landscapes glow.
- Play around with different compositions using the rule of thirds, leading lines, and including foreground elements to add depth and interest to your shots.
- Don’t forget post-processing in programs like Adobe Photoshop or Lightroom can further enhance colors, adjust exposure levels, fix white balance issues, and sharpen details carefully without introducing noise into the picture.
Understanding Landscape Photography

Landscape photography goes beyond just snapping pictures outside. It’s about forming a deep connection between the viewer and nature. Photographers strive to capture the beauty and essence of the outdoors, making every photo an invitation to explore more deeply.
This style of photography requires not only creativity but also a solid understanding of camera settings like aperture, shutter speed, exposure, and sharpness.
To master landscape photography, enthusiasts delve into various techniques and tools that enhance image quality—such as focus stacking for sharper images across all depths or using polarizing filters to cut glare and deepen blue skies.
Every decision from choosing the right lens—a wide-angle or telephoto—to adjusting the f-number affects how vividly a landscape is portrayed. Taking photographs during golden hour adds magic with soft light casting long shadows or giving surfaces a golden hue, engaging viewers even further into the scene captured.
Essential Landscape Photography Techniques

Mastering landscape photography means getting to grips with a range of techniques that can truly elevate your shots. From understanding how light plays on the landscape, to capturing images that tell a story, each method is a step towards creating breathtaking nature photographs.
Utilizing Quality Camera Equipment
Quality camera equipment makes a huge difference in landscape photography. A good DSLR or mirrorless camera captures the beauty of nature in stunning detail. Think about adding a wide-angle lens to your bag.
This helps you grab vast expanses of scenery with clarity and precision. Want deeper colors and less glare? Polarizing filters are your friend.
Don’t forget, that shooting in RAW format keeps all the image information you need for top-notch post-processing. Programs like Adobe Photoshop and Lightroom can turn good shots into great ones with this rich data at hand.
Remember, a sturdy tripod goes a long way too—especially for those breathtaking long exposures where even slight movements can blur your masterpiece.
Mastering Manual Exposure
Once you have the right camera equipment, taking control of manual exposure is your next step. It lets you adjust shutter speeds, apertures, and ISO settings to perfect your landscape photographs.
You decide how much light hits the sensor, which influences the depth of field and motion blur in your images.
Manual mode might seem daunting at first, but it gives you complete creative freedom. By experimenting with different combinations of f-stops and shutter speeds, you capture nature’s beauty as you see it.
This hands-on approach ensures that water reflections shimmer perfectly and the sunlight bathes landscapes just right. Plus, using a shutter release for long exposures will keep your shots sharp without any blurring from the camera shake.
Utilizing Good Lighting
Good lighting is like magic for landscape photos. It casts nature in its best light, literally. The golden hour–right after sunrise or just before sunset–bathes landscapes in warm tones that enhance colors naturally.
This soft, diffused light can make your photographs glow and stand out.
Mastering the art of using this magical hour requires planning. Check the weather conditions and know when the sun rises and sets. Position yourself to capture the landscape as it’s illuminated by golden hues.
This isn’t just about snapping a picture; it’s about painting with light, using your camera as the brush.
Incorporating Filters
Filters can transform your landscape photos from good to breathtaking. Using a polarizing filter, for instance, can enhance the blues in the sky and reduce reflections on water surfaces or leaves, giving your images a crisp look that stands out.
ND filters are another game-changer; they allow longer exposure times even in bright daylight. This means you can capture movement in clouds or create silky smooth water effects without overexposing your shot.
Try stacking different types of filters for creative effects. For example, combining a neutral density filter with a graduated ND filter lets you balance the light between a bright sky and darker land efficiently.
Always check your viewfinder or LCD screen to adjust settings as needed for optimal results. Next up is creating compelling compositions that draw viewers into your scene.
Creating Compelling Composition
Creating a compelling composition is like telling a story with your camera. Think about using the rule of thirds to break your scene into sections, making it more dynamic and interesting.
Place key elements where those lines intersect for an instant boost in visual appeal. Leading lines draw the viewer’s eye through the photograph, guiding them from foreground to background and adding depth.
Wide-angle lenses can help capture expansive landscapes but don’t forget telephoto lenses for isolating distant details that tell part of nature’s story too.
Imagine aerial views over Greece or close-up shots of Canadian wildlife; each requires a different approach to composition. Use framing to enclose your subject with natural surroundings, creating a window-like effect that focuses attention.
And remember, changing your perspective can reveal hidden patterns or turn an ordinary scene into an extraordinary one—like finding unique angles in urban environments or capturing the intricate textures of mountainous terrain.
Next up, we’ll explore focusing techniques that ensure every element is crystal clear.
Focusing Techniques
Mastering focusing techniques can make or break your landscape photos. With hyperfocal focusing, you ensure everything from the foreground to the horizon is sharp. This method involves calculating the hyperfocal distance and setting your focus point there.
It sounds complex, but with practice, it becomes second nature for sharper images.
Manual focus gives you control over your camera’s focal point, essential in low light or when dealing with tricky subjects like water reflections. By adjusting the aperture and shutter speed, you also manipulate depth of field for that perfect shot—whether it’s a wide-angle view of mountains bathed in golden hour light or a detailed close-up of nature’s patterns.
Don’t shy away from experimenting; each attempt brings you closer to mastering these skills and elevating your nature photography craft.
Including Foreground Elements
After sharpening your focusing techniques, it’s time to dive into adding foreground elements to your landscape shots. This method transforms good photos into great ones by introducing depth and interest.
A simple rock, a cluster of flowers, or even human figures can anchor the viewer’s gaze and lead them deeper into the scene. It’s all about creating a path for the eye to follow.
Foreground elements not only enhance depth—they also tell a story. By carefully choosing what to place in front of your lens, you give context and scale to the vastness of nature.
This juxtaposition between the near and far adds layers to your image, making each photograph a journey worth exploring.
The Importance of Shooting in RAW
Shooting in RAW format is a game-changer for landscape photographers. This method captures all the data from your camera sensor, offering unparalleled flexibility during post-processing.
Unlike JPEGs, RAW files preserve more details and allow you to tweak exposure, white balance, and other settings without loss of quality. It’s like having a digital negative that you can develop in many ways.
RAW images grant better dynamic range and color depth, essential for capturing nature’s true beauty. They let photographers correct mistakes or enhance photos with ease in software like Adobe Lightroom or Photoshop.
By choosing RAW, you ensure every landscape shot holds the potential for stunning visual storytelling—preparing you perfectly for exploring the role of creativity next.
The Role of Creativity
After exploring the significance of shooting in RAW, it’s clear that having high-quality images gives photographers a canvas to express their creativity. Creativity plays a pivotal role in landscape photography, transforming ordinary scenes into breathtaking views.
It involves looking at nature through a unique lens and envisioning how different elements like lighting, composition, and perspective can merge to create something truly spectacular.
Photographers use creativity to push boundaries and challenge traditional ways of seeing the world. Whether it’s experimenting with long exposures to blur moving water or employing ultra-wide-angle lenses for an exaggerated perspective, creative decisions make each photograph stand out.
This approach not only enhances the beauty of natural landscapes but also allows photographers to put their stamp on every image they capture.
Post-Processing Techniques
Shooting in RAW format opens up a world of possibilities in post-processing your landscape photos. Programs like Adobe Photoshop and Lightroom are essential tools for transforming your shots into professional-level masterpieces.
- Adjust exposure and contrast: Fine-tune the light and dark areas to make your landscape photos pop. This can bring out details that were not visible before.
- Correct the white balance: Sometimes, the colors in your photos might not match the real scene. Adjusting the white balance can help restore the photo’s natural colors.
- Enhance colors with vibrancy and saturation sliders: Boosting these can make your landscapes look more vivid without overdoing them.
- Utilize the clarity and texture tools: These adjustments can give more definition to clouds, water, and foliage by enhancing fine details without increasing noise.
- Crop and straighten for composition: Not all shots come out perfectly aligned. Cropping can help you remove unwanted parts while straightening keeps your horizons level.
- Apply lens correction filters: Fix common lens issues like distortion or chromatic aberration that can affect image quality.
- Experiment with graduated filters: These are perfect for balancing exposures between the sky and land, which is a common challenge in landscape photography.
- Use healing brushes for spot removal: Get rid of unwanted objects or blemishes such as dust spots or stray branches that distract from the main subject.
- Play with selective adjustments: Tools like radial filters or adjustment brushes let you tweak exposure, color, or detail on specific parts of your image without affecting the whole photo.
- Merge exposures with HDR techniques: Capture a wider range of light by blending multiple photos taken at different exposures into one HDR image.
- Convert images to black and white: Explore the dramatic effect monochrome can have on your landscape images by focusing on contrasts and textures instead of color.
- Sharpen details carefully: Enhance edge sharpness to make details stand out but be careful not to introduce noise into the picture.
- Add vignettes for focus: A subtle vignette can draw attention toward the center of the image, placing more emphasis on your main subject.
- .. Dive deeper into creative editing with layers and masks in programs like Photoshop for advanced manipulation beyond basic adjustments.
Advanced Landscape Photography Techniques
Diving deeper into landscape photography, advanced techniques can truly elevate your shots from good to breathtaking. These methods involve a creative twist on focus, depth, and capturing the essence of scale and contrast in nature’s vast canvas.
Changing Focus
Changing focus in landscape photography isn’t just about adjusting your lens. It’s a way to tell different stories within the same frame. For instance, focusing on a nearby flower with a mountain range in the backdrop can create depth.
This technique makes your photos more engaging and adds layers to the narrative you’re capturing.
Experimenting with various focal lengths can drastically change how landscapes are portrayed. A wide-angle lens might capture vast expanses, while switching focus to something closer with a telephoto lens brings distant details into sharp relief.
Each choice informs the viewer’s experience, guiding their eye through the scene you’ve framed. Using aperture priority mode helps control this aspect by managing how much of your shot is in clear view from front to back.
Playing with Depth
After mastering the art of changing focus, diving into playing with depth opens up new perspectives in landscape photography. Creating a sense of dimension is crucial for making your images pop.
Leading lines and foreground elements are your best friends here—use them to guide the viewer’s eye through the scene. Experimentation is key; try different aperture settings to see how they affect your image’s depth of field.
A shallow depth of field can make your subject stand out by blurring the background, while a deeper focus pulls everything into clarity, from the flowers at your feet to the mountains in the distance.
Don’t be afraid to play around with these settings during various times of day to capture unique lighting effects that enhance depth further. Remember, it’s all about adding that third dimension and drawing viewers into your photograph as if they were standing right there with you.
Showcasing Scale
Showcasing scale in landscape photography can transform a good photo into a breathtaking one. By including objects of known size, like people or trees, you give viewers a frame of reference.
This technique makes mountains more majestic and waterfalls seem taller. Using a wide-angle lens, such as an ultra-wide-angle lens, enhances this effect even further.
For example, capturing a person standing near the base of a towering waterfall emphasizes the waterfall’s height and power. Adjusting your perspective can also play a huge role in showcasing scale; shooting from lower angles makes subjects appear larger than life.
Your choice of camera settings is crucial here – selecting the right f-stop, like f/11 for depth while keeping everything sharp from foreground to background. Next up: capturing contrast to add drama to your landscapes.
Capturing Contrast
Capturing contrast in landscape photography can turn an ordinary scene into a stunning image. It’s all about finding the balance between light and shadow to create depth and drama.
Look for scenes where the interplay of sunlight and shadows highlights the textures and forms of nature. Early morning or late afternoon, known as the golden hour, offers soft yet contrasting light that accentuates details beautifully.
Utilizing your camera’s manual exposure settings—shutter speed, aperture, and ISO—is key to mastering contrast. Adjust these settings to control how much light enters your lens and hits the sensor, allowing you to capture rich colors and deep shadows effectively.
Remember, shooting in RAW format gives you more flexibility in post-processing, making it easier to enhance contrast without sacrificing image quality. Contrast isn’t just visual; it’s emotional storytelling through your lens.
Utilizing Water Reflections
Water reflections can turn a good landscape photo into an unforgettable one. They add depth and a sense of wonder to your images, making viewers pause and take in the beauty. To master this technique, find calm bodies of water during the golden hour.
This is when the light is softest, casting beautiful hues across the sky and water. Position your camera close to the water’s surface to maximize reflection effects.
Mirrorless cameras or DSLRs with a full-frame sensor are ideal for capturing sharp details in both the landscape and its reflection. Use a small aperture like f/16 to keep everything in focus, from foreground elements to distant horizons.
Experimenting with different shutter speeds can also create fascinating effects—slower speeds smooth out water surfaces, while faster ones capture dynamic ripples. Always shoot in RAW format for greater post-processing flexibility; enhancing those reflections can bring your landscape photography to new heights.
Overcoming “Frame Paralysis”
Getting stuck, or experiencing “frame paralysis,” can happen to any photographer. It’s that moment when everything looks either too bland or overwhelming, and snapping a meaningful shot seems impossible.
Understanding lighting plays a pivotal role here. Try scheduling your shoots during the golden hour for softer shadows and warmer tones, or blue hour for cool, ethereal light. These times of day can dramatically transform a scene, pushing past that creative block.
Filters are your friends in landscape photography—they add depth and drama without post-processing fuss. A polarizing filter will make those skies pop and cut through reflections on water, giving you crisper images.
Neutral density filters let you play with longer exposures during bright daylight, smoothing out waterfalls or creating ghostly silhouettes of moving clouds. Keep focusing sharp by zeroing in on your main subject; this ensures clarity where it counts.
Don’t forget to include something interesting upfront—a rock formation or winding path—to lead viewers into the scene naturally. Above all, keep experimenting with different elements—reflective surfaces after rainstorms or unexpected human figures can turn an ordinary landscape into something extraordinary.
Landscape Photography in Different Environments
Landscape photography thrives on diversity; every environment offers unique challenges and rewards. From the bustling streets of urban landscapes to the serene peaks of mountains, photographers find endless opportunities to capture nature’s vast beauty.
Landscape Photography in Urban Settings
Urban settings offer a unique canvas for landscape photography enthusiasts. Cities buzz with dynamic scenes—from towering skyscrapers touching the clouds to tranquil parks nestled among concrete giants.
Capturing these elements requires you to see the city through a different lens, literally and figuratively. You’ll navigate bustling streets and quiet corners, hunting for that perfect shot that tells a story of urban life.
It’s all about perspective in urban landscape photography. Experiment with angles to showcase the architecture’s magnificence or use softer light during golden hour to paint the scene in warm hues.
Street scenes come alive when photographed from interesting vantage points—think rooftops or low-ground perspectives. Adding people can also infuse energy into your photos, turning an ordinary street view into a snapshot of city life in motion.
Remember, every building, shadow, and face has its place in the urban mosaic you’re capturing with your DSLR camera or smartphone camera.
Capturing Reflections in Landscape Photography
Moving from the concrete jungle to the natural world, capturing reflections in landscape photography brings a unique layer of beauty to your shots. Reflections can turn an ordinary scene into something magical, adding depth and symmetry that draw viewers in.
From serene waterfalls reflecting the lush greenery around them to tranquil woodland scenes mirrored on the surface of a lake, these moments are ripe for capturing.
Mastering this technique involves finding calm waters or glossy surfaces that act as natural mirrors. Early mornings or late afternoons are perfect since light is soft, and winds tend to be lighter—ideal conditions for clear reflections.
Remember, shooting at a low angle can enhance the mirror effect in your photographs, making mountains and trees seem like they’re floating on air. Whether you’re using a digital single-lens reflex camera or a smartphone, experimenting with different angles and settings will help capture stunning reflective landscapes that stand out on any Instagram feed.
Landscape Photography Tips for Mountainous Terrain
Capturing the grandeur of mountainous terrain requires a bit of know-how and the right gear. First off, choose a camera with a high-resolution sensor to catch all those detailed landscapes from afar.
A lens with a deep focus is essential too; it lets you capture both the towering peaks in the distance and intricate foreground details sharply. Use filters judiciously – a polarizing filter can reduce glare off snowy caps and enrich the blues of the skies.
Timing is everything in landscape photography, especially in mountains. Aim for early morning or late afternoon when the light casts beautiful shadows and gives texture to your scene, known as golden hour photography.
Don’t shy away from experimenting with different exposures; this can lead to capturing changes in weather conditions that add drama. And remember, composing your shot with some interesting foreground—a set of rocks, blooming wildflowers—draws viewers into your photo, creating depth and perspective.
Night Sky and Milky Way Photography
Moving from the majestic heights of mountains, we dive into the vast expanse of the night sky and Milky Way photography. This genre adds a mesmerizing dimension to landscape photography, bringing stars and cosmic vistas within our reach.
To capture the night sky, you need a camera with manual settings for complete control over exposure. A tripod is essential too, as it helps avoid blurry images during long exposures needed to photograph star trails or the Milky Way.
Understanding your camera’s shutter speed, aperture (ideally f/2.8 for sharp stellar shots), and ISO setting is crucial for astrophotography success. Focusing on stars can be challenging; thus, using manual focus ensures that stars appear as crisp points rather than blurred orbs.
Photographing in RAW image format maximizes photo quality and post-processing flexibility—allowing you to bring out details of the night sky not visible to the naked eye. By combining these techniques with patience and creativity, photographers can produce stunning snapshots of our universe right from Earth’s surface.
Special Techniques and Considerations in Landscape Photography
Landscape photography isn’t just about finding a pretty scene and clicking the shutter. It’s an art that blends creativity with technical skill, inviting you to dive deeper into specialized techniques and thoughtful considerations.
HDR Photography in Landscapes: Techniques and Tips
HDR photography breathes life into landscape photos by capturing the full spectrum of light and shadow. This technique requires taking multiple shots at different exposure levels. You then blend these images into one using post-processing tools, ensuring every detail from the darkest shadows to the brightest highlights is visible.
The key lies in understanding how to manage your camera settings—adjusting the camera shutter and manipulating sensor size for optimal exposure.
A sturdy tripod is your best friend for HDR shoots, eliminating any movement that can blur your composite image. Careful scene selection also plays a crucial role; not all landscapes benefit from HDR, so pick scenes with a wide range of lighting.
Mastering this approach involves a delicate balance between technical skill in setting up your shot and creative vision during post-processing. Dive deep into photo editing software capabilities, like adjusting iris or applying lens filters, to enhance the final HDR image’s depth and realism.
Black and White Landscape Photography
Moving from the dynamic range of HDR photography, black-and-white landscape photography offers a deep dive into textures, contrasts, and timeless beauty. This technique strips away the distraction of color to focus on raw emotional impact.
It requires a unique perspective to capture nature’s essence in shades of gray.
Black and white imagery challenges photographers to think differently about their surroundings—highlighting shapes, light patterns, and compositions that might go unnoticed in full color.
Mastering this art involves advanced post-processing skills like three-step sharpening and blending exposures for dramatic effects. Photographers use tools such as Ansel Adams’ zone system for stunning results that evoke strong feelings.
Through careful planning and creative vision, capturing stunning black-and-white landscapes becomes an unparalleled way to portray the world with depth and emotion.
Panoramic Photography Techniques and Stitching
Shifting our focus from the timeless appeal of black and white landscapes, let’s dive into the dynamic world of panoramic photography techniques and stitching. Panoramic photos can transform a beautiful scene into a breathtaking wide-format image, capturing the essence of a landscape in one sweeping glance.
To create these magnified views, photographers must master both their camera settings and post-processing skills.
Start by setting your camera on a tripod to ensure stability and consistency across shots. Use a panorama head if available, to maintain the same angle and height for each photo. Choose manual exposure to keep lighting uniform in all frames.
Shoot a series of overlapping images—each covering about 30-50% of the previous frame—to ensure seamless stitching later on. In post-processing, use software like Adobe Photoshop or Lightroom which offer panoramic stitching features; they automatically align, blend edges, and adjust exposure across images for that perfect panorama shot.
Remember—patience is key as you practice aligning those shots just right for stunning panoramic vistas!
Long Exposure Photography: Waterfalls and Seascapes
Moving from the expansive views captured through panoramic photography, we dive into the dynamic world of long-exposure photography – a realm where waterfalls and seascapes come alive with ethereal beauty.
This technique lets photographers create magical scenes where moving water appears silky smooth, and seascapes gain otherworldly tranquility. Essential for capturing the splendor of such landscapes, it requires a careful balance of camera settings, including a slow shutter speed coupled with the right lens diaphragm to manage light intake effectively.
To achieve these mesmerizing effects in your landscape photos, you’ll need to master using ND (Neutral Density) filters. These filters allow longer exposure times without overexposing your shot, especially under bright daylight conditions.
Coupled with a sturdy tripod and some patience, long exposure techniques can transform ordinary waterfall and seascape shots into breathtaking pieces of art. Keep in mind that shooting in RAW format is pivotal; it ensures that you capture the highest level of detail possible, giving you more flexibility during post-processing to bring out the subtle textures and tones in water movements against static elements like rocks or coastline features.
Using Filters in Landscape Photography: ND and Polarizing Filters
ND and polarizing filters play a crucial role in landscape photography, helping photographers manage exposure and cut glare. ND filters bring out a sense of motion by smoothing water and clouds, making landscapes feel timeless.
They turn bustling streams into silky smooth pathways and busy skies into serene backdrops. Polarizing filters step up the game by boosting colors and enhancing contrast, making every shot pop with life.
Experimentation is key to mastering these tools as lighting conditions change with the time of day. Landscape enthusiasts must practice using different densities of ND filters and angles of polarizing filters to see how each affects their shots.
Such hands-on experience allows for a better understanding of how these accessories can transform an ordinary scene into a stunning photograph, ready for advanced composition techniques in landscapes.
Advanced Composition Techniques for Landscapes
To capture the essence of a landscape, photographers often rely on advanced composition techniques. One such method includes changing focus points to guide the viewer’s eye through the scene.
Wide-angle lenses, as recommended for landscapes, allow for a broader perspective and when combined with a shallower depth of field, create stunning visuals that emphasize certain areas over others.
Playing with depth can transform a flat image into a dynamic one; it’s about layering foreground, midground, and background elements effectively.
Showcasing scale brings an entirely new dimension to landscape shots. By including objects or people known for their standard size, photographers can highlight the vastness or minuteness of natural settings.
Capturing contrast—whether in colors, lighting, or textures—adds drama and mood to photographs. Techniques like HDR photography further enhance this by balancing light and dark areas for more detailed images.
With these approaches in hand—a wide lens from your gear like Canon EOS or Sony Alpha—and creativity at play, transforming any landscape shot into a masterpiece becomes possible.
Planning and Preparation for Landscape Photography
To capture breathtaking landscape photos, planning is key–you’ve got to know where you’re going and what you’ll face. Packing the right gear and having a solid plan in place means you’re ready to snap those stunning scenes, no matter the weather or location.
Building a Portfolio of Landscape Photography
Building a strong portfolio is key for any photographer passionate about capturing nature’s beauty. Start by selecting your best shots, those that showcase diverse environments and demonstrate your skill with various photographic techniques.
Include images that highlight different times of the day, from the golden hour to the blue hour, to show your ability to use natural light creatively. Mixing in some panoramic photography can add an impressive touch while integrating shots that apply techniques like long exposure or HDR will exhibit your technical prowess.
Focus on quality over quantity. A well-curated portfolio tells a story through landscape photography—whether it’s the power of ocean waves you’ve captured using long exposure techniques or serene mountainous terrains bathed in the first light of dawn.
Consider incorporating black and white landscape photos to show contrast and depth differently, adding another layer to your portfolio’s narrative structure. Lastly, ensure each image is shot in RAW for maximum detail and post-processing flexibility, letting you fine-tune each photo into a masterpiece worthy of any gallery or client’s attention.
Ethical Considerations in Landscape Photography
Taking pictures of landscapes means you have to think about the environment and wildlife. You must avoid hurting nature or disturbing animals while capturing your shots. Always respect private spaces by getting the needed permissions before shooting on someone else’s property.
This ensures you’re doing photography without causing harm.
Getting consent from people in your photos is just as important. Whether it’s a hiker in the mountains or someone enjoying the beach, ask before including them in your landscape shots.
Next, let’s dive into how weather and seasonal changes can impact your landscape photography plans.
Weather and Seasonal Considerations in Landscape Photography
Weather and seasonal considerations are crucial in landscape photography. They determine the best times to capture nature’s beauty. Different seasons offer unique opportunities, from spring blooms to winter snowscapes.
Understanding weather patterns helps photographers plan their shoots. A clear forecast can lead to stunning sunset shots, while stormy skies add drama.
Choosing the right time of day is essential too, especially for lighting. Early morning and late afternoon often provide soft, golden light that enhances landscapes. Checking the weather forecast before heading out can save a lot of trouble and help find those perfect conditions for capturing breathtaking scenes with your camera or smartphone cameras.
Always prepare for weather changes to make the most of each photo opportunity.
Planning Your Landscape Photography Trip: Tools and Apps
After considering the weather and seasonal impacts on your landscape photography, it’s crucial to dive into the planning phase. Successful photos begin with meticulous preparation. Here’s a guide to tools and apps that will set your landscape photography adventure up for success:
- Google Earth – This app lets you scout locations before your trip. You can find epic viewpoints, assess the terrain, and even determine the sun’s position at different times of the day.
- Photopills – It’s everything a photographer dreams of in an app. From tracking the Milky Way to predicting sunrise and sunset times, this tool is indispensable.
- TPE (The Photographer’s Ephemeris) – Similar to Photopills but with a focus on how natural light affects your location throughout the day. Perfect for capturing that golden hour glow.
- Weather Apps – Don’t let rain or a storm ruin your shoot. Use apps like AccuWeather or The Weather Channel to stay ahead of Mother Nature.
- PeakFinder – Ideal for mountainous terrain photography, this app shows all the peaks around you with a 360° panorama display.
- Lightroom Mobile – For post-processing on the go, Adobe Lightroom provides powerful editing tools right at your fingertips.
- Star Walk – Night sky photographers will love this app for tracking constellations, planets, and the Milky Way in real time.
- Maps. me or Google Maps Offline Mode – Download maps of your remote shooting locations beforehand so you can navigate without cell service.
- AllTrails – If hiking is part of getting to your perfect shot location, AllTrails offers detailed trail maps and user reviews to prepare you for what’s ahead.
- PlanIt! For Photographers – A comprehensive planner that covers aspects like hyperfocal distance, and depth of field calculations besides sun/moon positioning.
- Long Exposure Calculator – When working with ND filters to capture waterfalls or seascapes, this app helps calculate the correct exposure time needed for that silky smooth effect on moving water.
- National Park Service App – Planning a shoot in a U.S. national park? This official app provides information about services, maps, and must-see spots within all national parks.
- Camera Manual PDFs – Last but not least, keep a digital copy of your camera manual saved on your phone for quick reference in case you need to troubleshoot or adjust settings while out in the field.
Gear and Settings for Landscape Photography
Choosing the right gear makes a huge difference in landscape photography. Knowing when to use the golden hour can transform your shots from good to breathtaking.
Best Cameras and Lenses for Landscape Photography
For landscape photography, the right equipment can make all the difference. High-quality cameras with larger sensors capture more detail and offer better dynamic range, essential for those breathtaking scenes.
In 2024, full-frame DSLRs and mirrorless cameras are top choices for enthusiasts eager to bring nature’s splendor to life. Brands like Nikon, Canon, and Sony lead the pack with models that balance high resolution with impressive low-light performance.
Turning our attention to lenses, the choice largely depends on your creative vision. Wide-angle lenses are a staple in a landscape photographer’s bag because they encompass vast expanses into a single frame without missing a beat.
For those intricate details or distant landscapes begging for attention, telephoto lenses step in to zoom closely and intimately connect with far-off subjects. And let’s not forget about polarizing filters—they reduce reflections and enhance colors making skies pop and water look crystal clear—vital tools for capturing landscapes at their most vivid.
Understanding the Golden Hour and Blue Hour
The Golden Hour and Blue Hour hold the key to unlocking magical landscape photos. These times offer soft, warm light during the Golden Hour and a blue-toned hue in the Blue Hour, perfect for adding drama and depth to your shots.
To make the most of these moments, you’ll need to plan. Understanding how aperture, shutter speed, and ISO settings affect your images during these periods is vital. This knowledge lets you capture the stunning quality of natural light that defines breathtaking landscapes.
Gear up with the right camera lens and adjust your camera settings for optimum results. Landscape photography thrives on patience and precision—especially during these fleeting hours.
Mastering manual exposure becomes crucial as lighting conditions change rapidly from minute to minute. Always shoot in RAW format to ensure maximum detail retrieval in post-processing, maximizing the spectacular effects of natural light at these times without losing image quality.
Experimentation combined with technical know-how can transform ordinary scenes into extraordinary snapshots under the enchanting hues of dawn or dusk.
Drone Photography in Landscapes: Regulations and Tips
Drone photography has transformed the way we capture landscapes, offering breathtaking aerial perspectives that ground-based cameras cannot match. Before flying your drone, make sure to check local regulations.
Many areas require permits, especially national parks or protected wildlife areas. Ignoring these rules can lead to hefty fines and even confiscation of your equipment.
For stunning shots, plan to fly during the golden hour for soft, natural lighting that adds magic to any scene. Keep the drone steady and avoid rapid movements for clearer images. Experiment with different heights and angles to find unique compositions that stand out.
Always respect the environment and privacy laws by not flying over private property without permission. Next up: a dive into post-processing landscape photos for maximum impact.
Post-Processing Landscape Photos: A Step-by-Step Guide
Editing landscape photos turns good shots into great masterpieces. Let’s dive into a step-by-step guide to post-processing your images for stunning results.
- Import and Organize: Start by importing your photos into Adobe Photoshop or Lightroom. Use folders or albums for easy navigation.
- Correct White Balance: Adjust the white balance to ensure colors look natural. Correcting white balance is crucial and can be done manually in Photoshop for precision.
- Adjust Exposure: If your photo is too dark or too light, tweak the exposure levels. Aim for a balanced image where details are visible in both shadows and highlights.
- Enhance Colors: Boost saturation or vibrance slightly to make your landscapes pop — but avoid overdoing it to keep the scene realistic.
- Sharpen Details: Apply a three-step sharpening process, especially if you’re working with RAW files, to bring out textures without introducing noise.
- Create HDR Panoramas: For wide landscape scenes, stitch multiple images together with Microsoft ICE or use Lightroom’s panorama feature for an impressive view.
- Optimize Contrast: Play with contrast settings, or use curves to add depth to your photos, highlighting the drama of landscapes.
- Work on Composition: Crop your image if necessary to follow rules like the Rule of Thirds, ensuring the main subject stands out and horizons are level.
- Focus on Advanced Edits: Experiment with HDR photography techniques and tips for dynamic range that captures every detail from darkest shadow to brightest light
- Dive into Long Exposure Edits: Perfect those waterfalls and seascapes by smoothing water and clouds with long exposure adjustments for a mystical effect.
- Final Touches with Filters: Apply ND (Neutral Density) or polarizing filters digitally if you didn’t use them during shooting — they can reduce glare and enhance skies.
Conclusion
Landscape photography captures the heart and soul of outdoor scenes, from bustling cityscapes to tranquil mountains. Every photo tells a story, framed by nature’s own artful composition.
With the right gear, a dash of creativity, and an eye for light, anyone can transform landscapes into breathtaking photographs. Master these techniques and watch as your gallery becomes an homage to the beauty around us.
Keep shooting, keep exploring; your next masterpiece awaits just over that horizon.
What Are the Essential Techniques for Capturing Landscape Photography?
When capturing stunning landscapes, remember these pro photography tips for landscapes: utilize leading lines to draw the viewer’s eye, consider the rule of thirds for balanced composition, experiment with different perspectives, and pay attention to the quality of light. These techniques will help you capture breathtaking landscape images.
FAQs
1. What’s so special about macro photography in landscape shots?
Macro photography lets you capture tiny details of nature, like a dewdrop on a leaf, making the photo almost magical. It’s not just about big views—these close-ups can showcase an entirely different side of landscapes.
2. How does sensor size affect my nature photos?
Well, here’s the thing: Larger sensors found in many photography cameras gather more light and detail. This means your landscape shots will be clearer, even when lighting is low. Think of it as giving your camera better “eyesight” to see all those stunning scenes.
3. Can I make cool effects with a fisheye lens in nature photography?
Absolutely! A fisheye effect bends straight lines and wraps the scene into a spherical shape—it’s like looking through a peephole but way cooler for artistic effects in your photos.
4. What’s panorama photography good for besides wide landscapes?
Panorama photography isn’t just for capturing vast fields or mountain ranges… It’s perfect for showing off any large-scale outdoor beauty without missing anything—not even that eagle flying off in the distance!