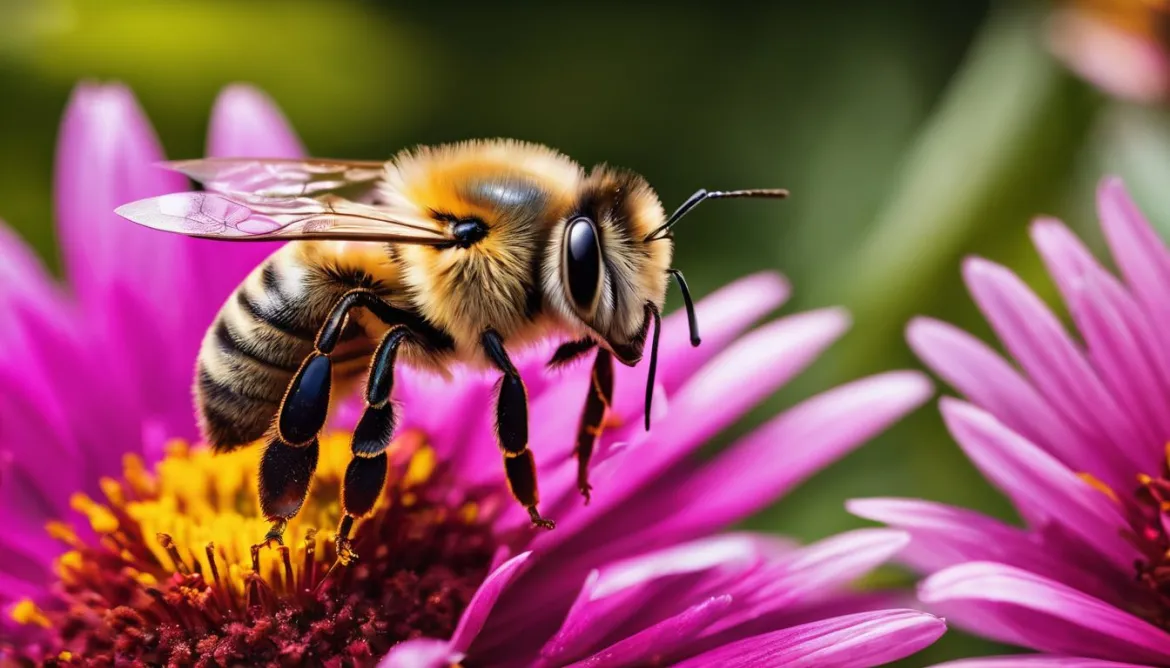
Color plays a significant role in macro photography, as it has the power to transform close-up shots into visually captivating images. By understanding color theory and utilizing it effectively, we can enhance our macro photographs and create stunning compositions that capture the viewer’s attention.
When it comes to color in macro photography, there are several key aspects to consider. The color of the background, the color composition and balance in the subject, and even the brightness and saturation of the colors can greatly impact the overall mood and visual appeal of the photograph.
Experimenting with different color palettes and compositions can open up endless possibilities for creating vibrant and visually appealing macro photographs. By using complementary or contrasting colors, we can bring out the subject by emphasizing its own colors. On the other hand, using similar background colors can create an organic feeling of assimilation.
Key Takeaways:
- Color is a significant element in macro photography that can transform close-up shots into visually captivating images.
- Understanding color theory and utilizing it effectively can enhance macro photographs.
- The color of the background, composition, and balance in the subject greatly impact the visual appeal of the photograph.
- Experimenting with different color palettes and compositions can open up endless possibilities for creating visually stunning macro photographs.
- Using complementary or contrasting colors can emphasize the subject, while similar background colors can create a sense of assimilation.
The Importance of Background in Macro Photography
In macro photography, the background plays a crucial role in emphasizing the subject and creating different looks and feels in a photograph. It’s not just about the main subject; the background elements and their characteristics contribute significantly to the overall effect of the image.
By changing the background, even with subtle adjustments in camera position, you can completely transform the composition and mood of a photograph. Factors such as the amount of blur, brightness, saturation, colors, and shapes of the background elements all play a role in achieving the desired outcome.
When considering the background, it’s important to pay attention to the relationship between the background distance and subject distance. This relationship plays a significant role in the direction of shooting and the effect on the background. Effort and careful consideration are required to achieve a background that complements the subject and creates a visual link between it and its environment.
Different photographers have preferences for smooth or busy backgrounds based on the size and dominance of the subject in the frame. Smooth backgrounds can help isolate the subject and draw attention to its intricate details, while busy backgrounds can add depth and context to the overall image.
The color of the background also plays a crucial role in emphasizing the subject. Both complementary and similar colors can be effective, depending on the desired effect. Complementary colors create a vibrant contrast and make the subject stand out, while similar colors create a harmonious and organic feeling.
Creating Different Looks with Background
Experimenting with different backgrounds allows photographers to create unique looks in their macro photographs. By utilizing various background elements and characteristics, you can achieve different moods and visual effects.
For example, a brightly colored background can create a cheerful and vibrant atmosphere, while a darker background can evoke a sense of mystery and drama. The use of patterns, textures, and shapes in the background can add visual interest and create a dynamic composition.
Playing with the distance between the subject and the background can also yield interesting results. Shooting with a closer background can create a more intimate and immersive feel, while a farther background can provide context and depth to the overall image.
Overall, the background in macro photography is a powerful tool for photographers to enhance the visual impact of their photographs. By understanding its importance and experimenting with different backgrounds, photographers can create stunning and captivating macro images that truly stand out.
“The background in macro photography has the power to transform the entire image. By carefully choosing and manipulating the background elements, photographers can create captivating and visually appealing macro photographs.” – Alex Turner, Macro Photography Enthusiast
The Role of Lighting in Macro Photography
Lighting is a crucial element in macro photography as it directly affects the overall look and feel of the image. Proper lighting is essential for illuminating the subject, highlighting its details, and creating a visually striking photograph.
When it comes to macro photography lighting, both natural and artificial light sources can be used to achieve different effects. Natural light can provide a soft and diffused illumination, while artificial lighting allows for more controlled lighting setups.
The direction, intensity, and quality of light all play a role in creating shadows, textures, and highlights in macro shots. Experimenting with different lighting setups and techniques can help photographers achieve stunning and dynamic macro shots.
Controlling the light in macro photography often requires the use of diffusers, reflectors, or other light modifiers to achieve the desired result. These tools help to soften harsh lighting, reduce glare, and create a more balanced and even illumination.
It is important to consider the color temperature of the light source and adjust the white balance accordingly to maintain accurate colors in the photograph. This is especially crucial when using mixed lighting sources or shooting in different environments.
Pro Tip: To enhance the details of macro subjects, experiment with different lighting angles and positions. This can help create interesting shadows and highlights that add depth and dimension to your images.
Overall, understanding the importance of lighting in macro photography and knowing how to control light effectively can elevate your close-up images and bring out the intricate details of your subjects.
| Macro Photography Lighting Tips | Benefits |
|---|---|
| Experiment with natural light | Soft and diffused illumination |
| Use artificial lighting | Controlled lighting setups |
| Consider lighting direction | Create shadows, textures, and highlights |
| Utilize diffusers and reflectors | Soften harsh lighting and reduce glare |
| Adjust white balance | Maintain accurate colors in the photograph |
Using Depth of Field in Macro Photography
Depth of field is a crucial aspect of macro photography, allowing us to control the focus and clarity of different parts of our images. With macro photography, we often want to isolate our subject and draw attention to its intricate details, which is why the shallow depth of field characteristic of macro shots is so valuable. It creates a blurred background that serves as a perfect backdrop for showcasing the subject.
To control the depth of field in our macro photographs, we can make adjustments to the aperture setting on our camera. A larger aperture, indicated by a smaller f-stop value, produces a shallow depth of field, resulting in a blurred background and a sharp focus on the subject. Conversely, a smaller aperture, indicated by a larger f-stop value, increases the depth of field and brings more of the image into focus.
Selective focus is another technique we can use in macro photography to highlight specific details or elements within the frame. By carefully choosing our focal point and adjusting the depth of field accordingly, we create a visually striking composition that captures the viewer’s attention.
Experimenting with different aperture settings and focal points is key to achieving the desired depth of field in our macro photographs. By understanding how depth of field affects the overall look and feel of our images, we can create captivating macro shots that showcase the beauty and intricate details of our subjects.

| Aperture (f-stop) | Depth of Field Effect |
|---|---|
| Wide aperture (small f-stop value) | Shallow depth of field, blurred background, and sharp subject focus |
| Narrow aperture (large f-stop value) | Greater depth of field, more of the image in focus |
Composition Techniques in Macro Photography
In macro photography, composition plays a crucial role in creating visually pleasing and balanced images. By employing various composition techniques, such as framing, the rule of thirds, and leading lines, photographers can capture dynamic and engaging macro shots.
Framing the Subject
One effective way to enhance the composition in macro photography is by framing the subject with elements in the foreground or background. By incorporating natural elements or man-made objects around the subject, you can add depth and context to the image. This technique creates a sense of immersion and draws the viewer’s attention to the subject.
The Rule of Thirds
The rule of thirds is a fundamental principle in photography, and it can be applied effectively in macro shots as well. Instead of placing the subject in the center of the frame, position it off-center using the grid lines created by dividing the frame into thirds horizontally and vertically. This creates a more dynamic and visually interesting composition, adding balance and drawing the viewer’s eye to different parts of the image.
Leading Lines
Leading lines are a powerful composition technique that can guide the viewer’s eye through the image and create a sense of movement. In macro photography, look for natural lines or man-made structures that can serve as leading lines. They can be curves, diagonals, or even straight lines that direct the viewer’s gaze towards the subject, connecting different elements and adding a sense of flow to the composition.
Experimenting with different compositions and incorporating these techniques can help you create visually striking macro shots. By framing the subject, using the rule of thirds, and incorporating leading lines, you can elevate the visual impact of your macro photography.
Composition Techniques in Macro Photography
| Technique | Description |
|---|---|
| Framing | Add depth and context by framing the subject with elements in the foreground or background. |
| Rule of Thirds | Place the subject off-center using the grid lines created by dividing the frame into thirds horizontally and vertically. |
| Leading Lines | Use natural or man-made lines to guide the viewer’s eye through the image and create a sense of movement. |
Post-Processing Tips for Macro Photography
In the world of macro photography, post-processing plays a crucial role in enhancing the final image by bringing out the intricate details captured in the shot. By mastering the art of post-processing, we can elevate our close-up images to a whole new level of visual appeal. Let’s explore some essential post-processing tips that can help us achieve stunning macro photographs.
Adjusting Colors and Tones
One of the key aspects of macro photography post-processing is adjusting colors and tones to enhance the overall mood and impact of the image. By fine-tuning the colors, we can bring out the vibrant hues and create a visually captivating photograph. Experiment with adjusting the saturation and vibrancy of the colors to make them pop, while also ensuring that they remain true to the original subject. Similarly, adjusting the tones and contrast can help us create depth and dimension in our macro shots, enhancing the overall visual impact.
Using software tools such as Adobe Lightroom or Photoshop, we can easily make these adjustments by manipulating the sliders for saturation, vibrancy, exposure, highlights, shadows, and more. Through trial and error, we can find the perfect balance of colors and tones that suit our artistic vision.
Advanced Techniques for Detail Enhancement
To truly make our macro images stand out, we can utilize advanced post-processing techniques to enhance specific areas and bring out the finest details. Techniques like dodging and burning allow us to selectively lighten or darken specific parts of the image, adding depth and emphasizing intricate textures. This can be particularly effective in highlighting the delicate patterns or textures on a flower petal or the veins on an insect’s wing.
Selective color adjustments can also be applied to emphasize certain colors and create a focal point within the image. By boosting the saturation of a specific color or desaturating others, we can draw the viewer’s attention to the most important elements of the photograph.
Furthermore, sharpening is a crucial step in macro photography post-processing, as it enhances the details and crispness of the image. However, it’s important to use sharpening tools judiciously, as going overboard can result in an unnatural and harsh look. Experiment with different levels of sharpening to find the right balance that preserves the fine details without introducing unwanted artifacts.
Experimenting with Different Techniques
Post-processing in macro photography offers a realm of endless possibilities, and the best way to discover the most effective techniques is through experimentation. Don’t be afraid to explore different software options, as each may offer unique features and tools that can elevate your macro photographs. Take the time to learn and master the various adjustments and techniques available to you, allowing you to express your creativity and personal style in your post-processing workflow.
Remember, post-processing is not a one-size-fits-all approach. What works for one photograph may not work for another. Trust your creative instincts, experiment with different settings, and embrace the joy of discovering new ways to enhance your macro images. With each post-processing session, you’ll refine your skills and develop a distinct style that truly showcases your artistic vision.

Enhancing the details and bringing out the full potential of your macro photographs through post-processing takes time and practice. By adjusting colors and tones, applying advanced techniques for detail enhancement, and experimenting with different techniques, you can take your close-up images to a whole new level of visual excellence. Remember, post-processing is an art form that allows you to express your creative vision and make your macro photographs truly shine.
Overcoming Challenges in Macro Photography
Macro photography presents unique challenges that photographers must overcome to achieve successful close-up shots. In this section, we will explore two of the main challenges faced in macro photography: dealing with shallow depth of field and handling camera shake in close-up shots.
Dealing with Shallow Depth of Field
One of the primary challenges in macro photography is managing the shallow depth of field. Due to the close proximity to the subject, it can be difficult to achieve optimal focus throughout the entire image. Fortunately, there are several techniques that can help mitigate this challenge:
- Using smaller apertures (larger f-stop values) can increase the depth of field, allowing more of the image to be in focus.
- Employing focus stacking techniques involves taking multiple shots at different focus points and then combining them in post-processing to create a final image with a larger depth of field.
- Manual focusing can provide greater control over the focus point, allowing you to precisely focus on the desired area of the subject.
Handling Camera Shake in Close-up Shots
Another challenge in macro photography is camera shake, which can result in blurry images. To avoid camera shake and ensure sharp close-up shots, consider the following techniques:
- Using a tripod or other stabilization techniques, such as a monopod or bean bag, can provide stability and minimize camera movement.
- Utilizing a remote shutter release or self-timer can prevent camera shake caused by physically pressing the shutter button.
- Minimizing camera movement by gently pressing the shutter button or using mirror lock-up mode (if available) can further reduce the risk of blurriness.
While shallow depth of field and camera shake are significant challenges in macro photography, other challenges may also arise, such as subject movement, lighting conditions, and environmental factors. By staying aware of these challenges and employing appropriate techniques and equipment, photographers can overcome them and capture stunning macro shots.
Tips for Getting Started with Macro Photography
Are you ready to dive into the mesmerizing world of Macro Photography? We’ve got you covered with some essential tips to help you get started on your macro photography journey. Whether you’re interested in capturing the intricate details of nature, exploring the hidden beauty in everyday objects, or expressing your creativity through close-up images, macro photography offers endless possibilities. Let’s take a look at what you need to know:
1. Essential Equipment for Close-Up Images
To achieve high magnification and capture stunning close-up shots, you’ll need some essential equipment.
- Macro Lens: Invest in a quality macro lens or consider close-up accessories like extension tubes or close-up filters. These tools will allow you to focus on the tiny details and bring them to life.
- Sturdy Tripod: Stability is crucial in macro photography to avoid camera shake and achieve sharp, clear images. A sturdy tripod will provide the necessary support.
- Remote Shutter Release: A remote shutter release or self-timer will help eliminate camera movement, ensuring crisp shots.
- Lighting Equipment: Consider using LED ring lights or macro flashes to illuminate your close-up subjects effectively. Proper lighting is essential for capturing the details.
2. Best Practices for Beginners in Macro Shots
Once you have the right equipment, it’s time to start capturing stunning macro shots. Here are some best practices to keep in mind:
- Understanding Focusing Techniques: Experiment with different focusing techniques such as manual focus, autofocus modes, or focus stacking to ensure optimal sharpness and clarity.
- Controlling Depth of Field: Explore the creative possibilities of depth of field in macro photography. Adjust your aperture to control how much of the image is in focus, allowing you to highlight specific details or create a dreamy, blurred background.
- Experimenting with Composition: Macro photography offers a unique perspective. Play around with different angles, framing techniques, and compositions to create visually striking images.
- Exploring Different Subjects and Environments: Don’t limit yourself to one subject or location. Experiment with various subjects, from flowers and insects to everyday objects. Each subject offers its own set of challenges and opportunities for creativity.
- Regular Practice and Continuous Learning: Like any skill, macro photography requires practice and learning. Keep exploring, experimenting, and refining your techniques to improve your skills and capture breathtaking macro shots.
Remember, macro photography is all about exploring the intricate details and beauty in the miniature world. Start with these tips, and let your imagination and creativity guide you in capturing stunning macro shots!
Conclusion
Wrapping up our exploration of macro photography, we have delved into the fascinating world of close-up photography and discovered its endless possibilities. By understanding and harnessing the power of color, background, lighting, depth of field, composition, post-processing, and overcoming various challenges, photographers can create stunning and visually appealing macro photographs.
Macro photography allows us to capture the intricate details and beauty of the miniature world. From the vibrant colors of nature to the hidden artistry in construction, and even the mesmerizing intricacies of everyday objects, macro photography enchants both photographers and viewers alike.
With the right equipment, knowledge, and practice, you too can embark on this captivating journey into macro photography. Grab your macro lens, embrace the beauty of the close-up, and immerse yourself in the world of mesmerizing details. Let your creativity flourish as you explore the fascinating world that lies just beyond the ordinary view.
FAQ
What is the role of color in macro photography?
Color plays a significant role in macro photography, as it can transform close-up shots into vibrant and visually captivating images. Understanding color theory and utilizing it effectively can enhance macro shots.
How does the background impact macro photography?
The background in macro photography is essential in emphasizing the subject and creating different looks and feels in a photograph. The color, blur, brightness, saturation, and shapes of the background elements all contribute to the overall effect of the image.
How important is lighting in macro photography?
Lighting is a crucial element in macro photography as it directly affects the overall look and feel of the image. Proper lighting is essential for illuminating the subject, highlighting its details, and creating a visually striking photograph.
How can depth of field be used in macro photography?
Depth of field is a crucial aspect of macro photography, as it allows photographers to control the focus and clarity of different parts of the image. The shallow depth of field in macro photography results in a blurred background, which helps to isolate the subject and draw attention to the details.
What role does composition play in macro photography?
Composition is a crucial element in macro photography as it helps to create a visually pleasing and balanced image. Framing, the rule of thirds, leading lines, and other composition techniques can be effectively applied in macro photography to create dynamic and engaging photographs.
How important is post-processing in macro photography?
Post-processing is an important step in macro photography to enhance the final image and bring out the details captured in the shot. Adjusting colors, tones, contrast, and sharpness can greatly improve the visual impact of a macro photograph.
What are the main challenges in macro photography?
Macro photography poses its own set of challenges, including the shallow depth of field, camera shake, subject movement, lighting conditions, and environmental factors. Understanding these challenges and employing appropriate techniques and equipment can help photographers overcome them and capture stunning macro shots.
What equipment is needed to start macro photography?
Getting started with macro photography requires essential equipment such as a macro lens or close-up accessories like extension tubes or close-up filters. A sturdy tripod, remote shutter release, and lighting equipment are also recommended for stable and well-illuminated close-up shots.
What is the key takeaway from macro photography?
Macro photography offers a unique and captivating way to explore the world of close-up photography. By understanding the role of color, background, lighting, depth of field, composition, post-processing, and overcoming challenges, photographers can create stunning and visually appealing macro photographs.
How Does Color Impact Macro Photography in Nature?
The use of specific colors can significantly enhance the impact of macro photography in nature capture. Vibrant and contrasting colors can draw attention to the intricate details of the subject, creating visually dynamic and captivating images. Color also plays a role in setting the mood and conveying the emotion of the scene.