Whether you’re a professional photographer or a passionate hobbyist, macro photography allows you to explore the captivating world of close-up shots. One of the fascinating aspects of macro photography is capturing movement, which adds a dynamic and visually engaging quality to your images. In this article, we will dive into the techniques and challenges involved in capturing movement in macro photography, providing you with expert tips and insights to enhance your skills.
Macro photography presents its own set of unique challenges, especially when it comes to capturing motion in close-up photos. From dealing with a shallow depth of field to freezing or creating intentional motion blur, understanding the nuances of macro photography techniques is key to achieving stunning results. We will guide you through the process, equipping you with the knowledge you need to capture mesmerizing moments in your macro shots.
Join us on this journey as we explore the world of macro photography and uncover the secrets to capturing movement in close-up shots. From choosing the right lens to mastering focus, utilizing natural light, and getting creative with backgrounds, we’ll help you take your macro photography skills to the next level.
Key Takeaways:
- Capturing movement in macro photography adds a dynamic and visually engaging quality to your close-up shots.
- Macro photography techniques require overcoming challenges such as shallow depth of field and capturing intentional motion blur.
- Choosing the right lens, mastering focus, utilizing natural light, and getting creative with backgrounds are essential for successful macro photography.
- Patience, steadiness, and the use of tripods and stabilizers contribute to sharper macro images.
- Experimentation and exploration are key to unleashing the full potential of capturing movement in macro photography.
Choosing the Right Lens for Macro Photography
Selecting the right lens is crucial for successful macro photography. There are several key factors to consider when choosing a lens that will meet your needs and capture stunning close-up shots.
Focal Length
One important consideration is the focal length of the lens. Macro lenses typically come in a range of focal lengths, from 50mm to 200mm. The focal length affects the distance you can maintain from your subject while still achieving a magnified image. A longer focal length allows for greater working distance, which can be useful when photographing skittish or delicate subjects.
Magnification Ratio
The magnification ratio is another crucial factor to consider. Look for a lens with a 1:1 magnification ratio, which means that the size of the subject projected onto the camera’s image sensor is the same as its actual size. This allows you to capture the finest details and produce true macro images that exhibit exceptional clarity.
Image Stabilization
In macro photography, even the tiniest movement can result in blurry images. To combat this, it’s beneficial to choose a lens with built-in image stabilization. Image stabilization technology helps reduce camera shake, allowing for sharper and more precise shots. This feature is especially important when shooting handheld or in situations where a tripod is not feasible.
With the right lens, you can capture the intricate details and breathtaking beauty of the macro world. Remember to consider factors such as focal length, magnification ratio, and image stabilization when selecting a lens for your macro photography endeavors. These features will help you achieve remarkable results and take your close-up photography to new heights.
Mastering Focus in Macro Photography
Achieving precise focus is essential in macro photography. By mastering focus, you can bring out the intricate details and create compelling close-up shots. Here are some techniques to enhance your focus control and improve the quality of your macro images.
Switching to Manual Focus
Instead of relying on autofocus, switching to manual focus gives you complete control over what part of the image is sharp. This is particularly important in macro photography, where the depth of field is often shallow. By manually adjusting the focus, you can ensure that the most important elements of your subject are in focus.
Experimenting with Focusing Techniques
While traditional focusing methods work well, macro photography offers opportunities to explore different techniques. One popular technique is “rocking,” where you manually move your body slightly forward and backward to adjust the focus. This subtle movement can help you find the desired sharpness.
Utilizing Focus Peaking
Some cameras offer a feature called focus peaking, which highlights the in-focus areas with a colored overlay or edge enhancement. This visual aid can be a valuable tool in macro photography, allowing you to quickly identify the sharpest areas in your composition. Experiment with focus peaking to achieve precise focus in your macro shots.
Managing Depth of Field
The depth of field in macro photography is often shallow due to the close proximity to the subject. To increase the area that appears sharp in your image, adjust the aperture (f-number) accordingly. A smaller aperture, represented by a higher f-number (e.g., f/16 or f/22), will result in a larger depth of field, bringing more of your subject into focus. Keep in mind that using smaller apertures may require longer exposure times or additional lighting to compensate for the reduced amount of light entering the camera.
By mastering focus in macro photography, you can create stunning images that showcase the intricate details of your subjects. Switching to manual focus, experimenting with focusing techniques, utilizing focus peaking, and managing the depth of field will all contribute to achieving precise focus in your macro shots.
Utilizing Natural Light in Macro Photography
Natural light is a powerful tool that can enhance the beauty of macro photography. By understanding how to utilize different types of natural light, you can create stunning and visually captivating images. In this section, we will explore various techniques to harness the potential of natural light when capturing macro shots.
The Golden Hour: Warmth and Softness
One of the most desirable times to shoot in natural light is during the golden hour. This is the period shortly after sunrise or before sunset when the sun is low in the sky, casting warm and soft light. The golden hour is a magical time for macro photography, as it brings out the colors and textures of your subjects in a beautiful and captivating way.
Diffused Light: Even Illumination
When shooting in natural light, it’s important to avoid harsh and direct sunlight, as it can create harsh shadows and blow out details. Instead, look for shaded areas where the light is filtered through leaves or clouds. This diffused light provides an even and pleasing illumination that can beautifully enhance the details of your macro subjects.
Backlighting: Silhouettes and Emphasis
Experimenting with backlighting can add a touch of magic to your macro photos. By positioning your subject in front of a light source, such as the sun or a lamp, you can create stunning silhouettes or emphasize the intricate details. Backlighting can add depth and drama to your images, transforming them into true visual masterpieces.
Reflecting Light: More Illumination
If you find yourself needing more light to properly expose your macro subject, you can use reflectors or white paper to bounce sunlight onto your subject. This technique helps to fill in shadows and add a gentle glow to your images. Reflecting light allows you to have more control over the lighting conditions, ensuring that your macro subjects are properly illuminated and showcased.
By harnessing the power of natural light in macro photography, you can elevate your images to a whole new level. The golden hour, diffused light, backlighting, and reflecting light are all techniques that can bring out the best in your macro subjects, adding depth, warmth, and visual interest. Remember to experiment, embrace the beauty of natural light, and capture the enchanting world of macro photography.
Patience and Steadiness for Sharp Macro Photos
When it comes to capturing stunning macro photos, patience and steadiness are essential. Taking the time to observe your subject and anticipate any movements or changes in lighting can make a significant difference in the outcome of your shots. It’s essential to stay calm and practice deep breaths to relax and reduce camera shake, leading to sharper images. Additionally, finding support by using stable surfaces or bracing the camera against your own body can further enhance steadiness and minimize blur. If possible, consider using a remote shutter release or self-timer to eliminate any potential camera shake caused by pressing the shutter button. By embracing patience and maintaining steady hands, you’re sure to achieve exceptional macro photos that showcase the smallest details with stunning sharpness.
| Patience in Macro Photography | Steadiness in Close-Up Photography | Reducing Camera Shake in Macro Photography |
|---|---|---|
| Observing the subject Anticipating movements and lighting changes |
Using stable surfaces Bracing the camera against the body |
Using remote shutter release or self-timer Practicing deep breaths to relax |
Tripods and Stabilizers for Enhanced Macro Shots
Capturing stunning macro photos requires a steady hand and precise positioning. That’s where tripods and stabilizers come in handy. These essential tools provide stability, allowing you to focus on composition and lighting while ensuring sharp and clear images. Read on to discover how tripods, focusing rails, monopods, and other stabilization tools can enhance your macro photography.
Tripods: A Solid Foundation for Stability
Investing in a reliable tripod is a game-changer for macro photography. Look for a model with adjustable legs and a sturdy build to ensure stability even on uneven terrains. The tripod will provide a solid foundation, preventing camera shake and allowing you to capture intricate details with ease. When using a tripod, you can have peace of mind knowing that your camera is steady, resulting in sharper and more focused images.
Focusing Rails: Precise Adjustments for Perfect Positioning
When it comes to macro photography, even the slightest movement can result in a loss of focus. Focusing rails are specialized tools that allow you to make precise adjustments in the camera’s position. By using a focusing rail, you can fine-tune the distance between the lens and your subject, achieving the perfect focus. This level of precision ensures that every detail is captured masterfully, making focusing rails a valuable addition to your macro photography gear.
Monopods: Portable and Versatile
If you’re looking for a more portable and versatile stabilization option, consider using a monopod. While not as stable as tripods, monopods offer excellent mobility, allowing you to quickly adjust your shooting position. They are particularly useful when shooting in challenging environments or situations where tripods are impractical. With a monopod, you can maintain stability while capturing close-up shots, giving you greater flexibility in your macro photography endeavors.
Experimentation is key when it comes to finding the perfect setup for your macro photography style. Try different combinations of tripods, focusing rails, and monopods to determine what works best for you. Each tool offers unique benefits that can elevate your macro photography to new heights. Find the stability that suits your needs and unleash your creativity!

Image: Tripods and stabilizers can greatly improve the quality of your macro photos.
Getting Creative with Backgrounds in Macro Photography
Backgrounds play a crucial role in macro photography, adding visual interest and enhancing the overall composition of your shots. By choosing the right backgrounds and employing creative techniques, you can elevate your macro photos to the next level. In this section, we will explore different ways to experiment with backgrounds and make them an integral part of your macro photography process.
1. Complementary Colors: When selecting backgrounds for your macro shots, consider using complementary colors to create a visually striking contrast. Complementary colors are located opposite each other on the color wheel, such as blue and orange or red and green. By placing your subject against a background with complementary colors, you can make it stand out and create a captivating visual effect.
2. Depth of Field: Experimenting with depth of field can also help you create unique backgrounds in macro photography. By adjusting your aperture settings, you can control the amount of background blur, also known as bokeh, in your images. A wider aperture (smaller f-number) will result in a shallower depth of field, allowing you to isolate your subject from the background and create a soft, dreamy backdrop.
3. Negative Space: Negative space refers to the empty or unoccupied areas in your composition. Incorporating negative space in your close-up shots can provide a sense of simplicity, minimalism, and focus on your subject. By leaving empty space around your subject, you can draw attention to its intricate details and create a visually pleasing composition.
4. Manipulating Light: Light plays a crucial role in photography, and macro photography is no exception. By manipulating natural or artificial light sources, you can create interesting shadows, highlights, and patterns in your background. Play around with different angles, use diffusers or reflectors to control the intensity and direction of light, or experiment with backlit subjects to create a dramatic effect.
Remember, the key to creating captivating backgrounds in macro photography is to explore and experiment. Every subject and setting is unique, so don’t be afraid to think outside the box and let your creativity guide you. With the right background choices and techniques, you can enhance the visual impact of your macro photos and capture stunning images that truly stand out.
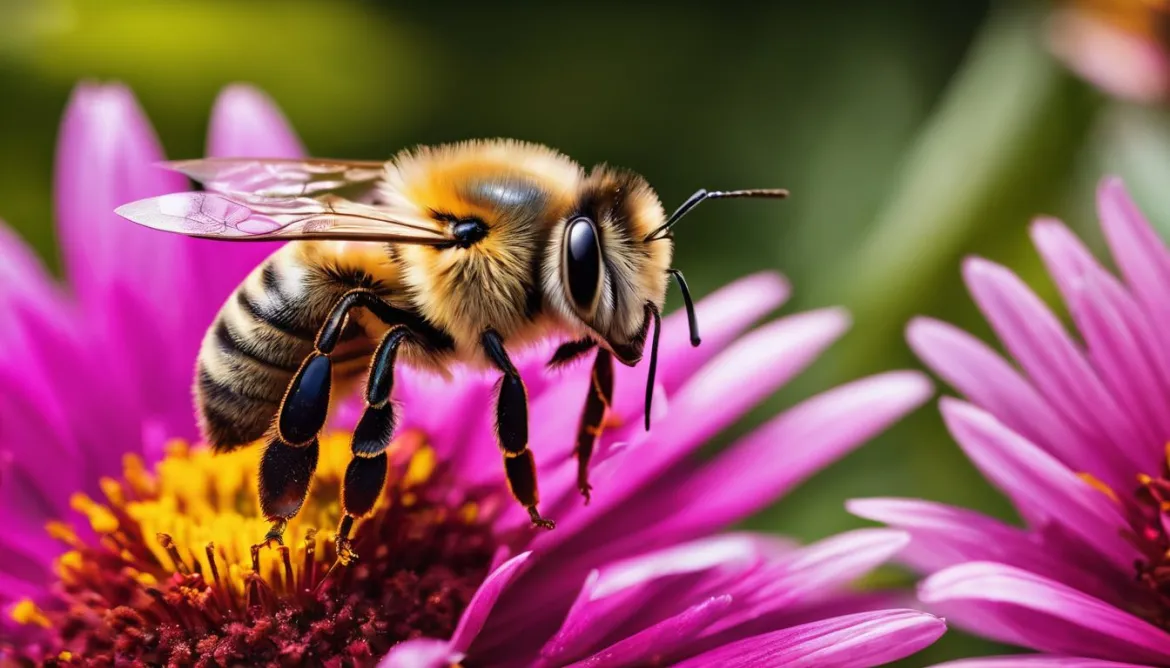
Capturing Interesting Textures in Macro Photography
Macro photography opens up a world of intricate details and textures that often go unnoticed by the naked eye. It allows us to showcase the hidden beauty of small subjects in stunning close-up shots. Whether it’s the delicate petals of a flower or the intricate patterns on an insect’s wings, macro photography reveals the fascinating textures that make up our world.
When capturing textures in macro photography, it’s important to pay attention to lighting and angles. The right lighting can bring out the subtle details and enhance the textures in your subject. Experiment with different lighting setups such as sidelighting or backlighting to create interesting shadows and highlights. Adjusting the angles can help emphasize the textures and create depth in your images.
One technique to consider is using a shallow depth of field. By using a wide aperture, you can create a shallow depth of field, which will blur the background and isolate the textures of your subject. This technique works particularly well when capturing textures that have a strong contrast with their surroundings.
Examples of Fascinating Textures in Macro Photography:
| Subject | Texture | Example Image |
|---|---|---|
| Flower Petals | Soft and velvety | |
| Insect Wings | Translucent and delicate |  |
| Tree Bark | Rough and textured |
Experimenting with different subjects is also a great way to explore diverse textures. From natural elements like leaves and rocks to man-made objects like fabrics or ceramics, there is an endless array of textures waiting to be discovered through your lens.
“Macro photography allows us to appreciate the tiny details that make up our world. It’s a gateway to a hidden universe of textures and intricacies, revealing the beauty that often goes unnoticed.”
So next time you’re out with your camera, take a closer look at the textures around you. Macro photography provides a unique opportunity to reveal the hidden details and showcase the beauty of the textures in our close-up photos.
Conclusion
In conclusion, macro photography opens up a world of possibilities for capturing movement and creating visually captivating images. By employing the right techniques and tools, you can overcome the challenges associated with macro photography and achieve stunning results.
One of the key factors in successful macro photography is choosing the right lens. Consider the focal length and magnification ratio to ensure you can capture the smallest details of your subjects. Additionally, utilizing natural light can enhance the beauty of your macro shots. Shooting during the golden hour and experimenting with different lighting conditions can bring out the colors and textures in your close-up photos.
Mastering focus and steadiness is crucial for achieving sharp macro images. Switching to manual focus gives you complete control over what parts of the image are sharp, while practicing patience and using stabilizers can help reduce camera shake. Tripods, focusing rails, and monopods can also contribute to steadier shots and improved image quality.
To add a creative touch to your macro photography, consider experimenting with backgrounds and capturing interesting textures. Choosing complementary colors for your backgrounds and manipulating light can create visually appealing contrasts. Moreover, focusing on the unique textures of your subjects can reveal hidden details and add depth to your photos.
In summary, macro photography offers endless possibilities for capturing movement and bringing out the beauty of the miniature world. By mastering the techniques discussed in this article and embracing the challenges, you can create stunning macro shots that leave a lasting impression.
FAQ
What are some tips for capturing movement in macro photography?
To capture movement in macro photography, you can try techniques such as using a fast shutter speed to freeze the action, panning to create motion blur, or experimenting with long exposures to capture the movement of subjects like water or insects.
What are the main challenges in macro photography?
Some of the main challenges in macro photography include achieving precise focus due to the shallow depth of field, dealing with camera shake, and finding suitable lighting conditions for capturing close-up shots.
How do I choose the right lens for macro photography?
When selecting a lens for macro photography, consider factors such as the focal length, which determines the distance you can maintain from your subject, and look for a lens with a 1:1 magnification ratio to capture fine details. Opt for a lens with built-in image stabilization for sharper images.
What are some techniques for mastering focus in macro photography?
To achieve precise focus in macro photography, switch to manual focus for complete control. Experiment with techniques like “rocking” to adjust focus and use focus peaking on cameras with this feature. Adjusting the aperture (f-number) can also help increase the depth of field and ensure more of your subject is in focus.
How can I utilize natural light for macro photography?
For stunning macro shots, shoot during the golden hour, where the warm and soft light can enhance colors and textures. Look for shaded areas with filtered light for even illumination. Experiment with backlighting to create silhouettes or emphasize details. Reflectors or white paper can be used to bounce light onto your subject if needed.
How can I reduce camera shake in macro photography?
Patience and steadiness are key to capturing sharp macro photos. Take your time to observe your subject and anticipate any movements or changes in lighting. Practice deep breaths to relax and reduce camera shake. Use stable surfaces or your body to brace the camera, and consider using a remote shutter release or self-timer to minimize camera shake.
What tools can I use for enhanced macro shots?
Tripods and stabilizers can greatly improve the quality of your macro photos. Invest in a tripod with adjustable legs and a sturdy build for stability. Consider using a focusing rail for precise adjustments. Monopods offer a portable and versatile option. Finding the right setup for your macro photography style will allow you to focus more on composition and lighting.
How can I get creative with backgrounds in macro photography?
Backgrounds play a crucial role in macro photography. Choose backgrounds with complementary colors to make your subject stand out. Experiment with different aperture settings to control depth of field and create background blur. Utilize negative space for minimalist compositions. Manipulate natural or artificial light to create interesting shadows and highlights in the background.
How can I capture interesting textures in macro photography?
Macro photography allows you to reveal intricate textures and details. Focus on capturing the unique textures of your subjects, such as flower petals or insect wings. Pay attention to lighting and angles to highlight the textures effectively. Experiment with different subjects to explore diverse textures and showcase the hidden beauty in your close-up photos.
What are the main takeaways for capturing movement in macro photography?
To capture movement in macro photography, it is important to choose the right lens and master focus techniques. Utilize natural light, practice patience, and use tripods or stabilizers for sharp images. Get creative with backgrounds and focus on capturing interesting textures. By overcoming challenges and experimenting with techniques, you can capture dynamic and visually captivating shots in macro photography.
How Can I Use Movement Capture Techniques in Water Droplet Macro Photography?
Using movement capture techniques in water droplet macro photography can create stunning and dynamic images. By carefully controlling the movement of the water droplets, you can capture unique and captivating moments. Whether it’s freezing the splashes or creating interesting patterns, there are endless possibilities to explore in water droplet macro photography.